

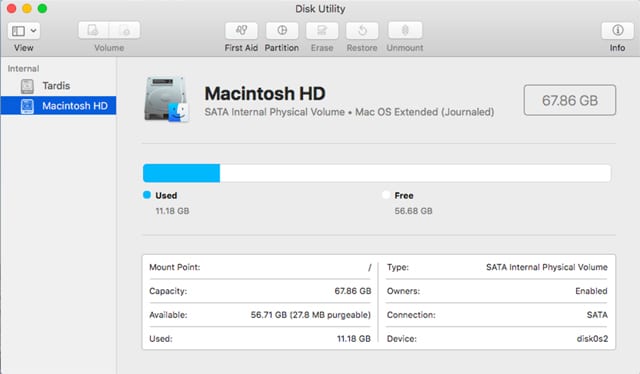
![]() macOS High Sierra brings with it a new filing system known as APFS (Apple File System). APFS replaces HFS+ (Hierarchical File System Plus), and offers a new, modern file system that is optimized for use with SSDs (Solid State Drives), while still being usable on hard drives and, in the near future, even on tiered storage systems such as Apple’s Fusion drive.
macOS High Sierra brings with it a new filing system known as APFS (Apple File System). APFS replaces HFS+ (Hierarchical File System Plus), and offers a new, modern file system that is optimized for use with SSDs (Solid State Drives), while still being usable on hard drives and, in the near future, even on tiered storage systems such as Apple’s Fusion drive.
As part of the upgrade process, the macOS High Sierra installer will automatically convert an SSD to the new APFS. The conversion process leaves the drive’s data intact, or at least it’s supposed to; be sure you have a recent backup before upgrading, just in case. At the time of this writing, the automatic conversion process is limited to internal SSDs. External SSDs being used as startup drives seem to be left with their original file system, with no conversion to APFS occurring. However, this could change with the next update to macOS High Sierra, as it seems Apple is committed to growing APFS usage across all Apple devices.
Although the conversion to APFS will happen automatically if your Mac startup drive meets the criteria, specifically, an SSD occupying a connection internally to your Mac, you can choose not to use APFS and force the installation to bypass the conversion process, leaving your startup drive in the older HFS+ format.
How to Prevent Automatic Conversion to APFS
There are a couple of strategies you can use to prevent the upgrade to APFS and retain the older HFS+ formatting:
Use an external drive: You can choose an external drive as the target for the macOS High Sierra upgrade. This will allow you to retain the current formatting on the external. Once the upgrade is complete, you can clone the external drive back to your normal internal startup drive. Carbon Copy Cloner and SuperDuper are two popular apps for creating clones. You could use Disk Utility’s Restore feature to create your clone as well.
Use startosinstall: macOS High Sierra includes a command line tool hidden away within the installer that can be used to control the conversion to APFS. By using this tool, you can tell the installer not to convert to APFS during the installation process.
While either method will work, using the startosinstall utility is the easiest and quickest process. It allows you to perform the macOS High Sierra upgrade without any conversion to APFS. It also allows you to skip the additional step and save the additional time needed to make a clone, as required in the external drive method.
Using Startosinstall to Prevent Conversion to APFS
Startosinstall is included as part of the macOS High Sierra installer. If you downloaded the installer from the Mac App Store, you’re all set. If you happen to have the installer open, waiting for you to start the macOS High Sierra install process, simply quit the installer (Command + Q). You need to invoke the installer from the Terminal command line for the option to not install APFS to be available.
Before you begin, make sure you have a recent backup of all the data on your current startup drive and the target drive for the installation (if they’re different). Better to be safe than sorry.
Startosinstall has a number of options for automating the installation process. This includes the APFS option, which can be used to prevent the conversion to APFS, or for that matter, to force the conversion, making it a bit easier to upgrade an external SSD to macOS High Sierra should you decide you want to use APFS.

When you’re ready, launch Terminal, located at /Applications/Utilities/.
Disable APFS Conversion
At the Terminal prompt, enter the following:
sudo /Applications/Install\ macOS\ High\ Sierra.app/Contents/Resources/startosinstall –applicationpath /Applications/Install\ macOS\ High\ Sierra.app –converttoapfs NO
and then press enter or return to start the upgrade process with no conversion to APFS. By the way, you can triple-click the above command to select the entire command, and then copy/paste it into Terminal.
Press enter or return, then supply your administrator password and press enter or return.
Note: When you enter your password in Terminal, no text will be displayed, giving the impression that Terminal isn’t accepting your input. This is a security feature to ensure prying eyes can’t see your password as it is typed.
You’ll be presented with the license for using macOS High Sierra. You can agree to the license terms by entering a capital A at the prompt.
The startosinstall script will start copying needed files to the target disk (in this example, the current startup disk). You’ll see Terminal counting up to one hundred. When it reaches 100, all the needed files will have been copied, and your Mac will reboot and start the actual installation of the new operating system without converting the startup disk to APFS.
Force APFS Conversion
You can use startosinstall to force a conversion to APFS in some cases, but not all. Apple currently prevents any Fusion drive from being converted. You can, however, use this command to force conversion on hard drives or SSDs. Please note: at this time you may want to limit the use of APFS to just your SSDs. See the Take a Deep Dive into Apple’s APFS video for details.
At the Terminal prompt, enter the following:
sudo /Applications/Install\ macOS\ High\ Sierra.app/Contents/Resources/startosinstall –applicationpath /Applications/Install\ macOS\ High\ Sierra.app –converttoapfs YES
Press enter or return.
Terminal will start copying the needed files to the startup disk. Once the process is complete, your Mac will restart and complete the installation of macOS High Sierra, including the conversion of the startup drive to APFS.
Install macOS High Sierra on a Drive Other Than the Startup Disk
So far we’ve seen how you can use Terminal to install macOS High Sierra on the startup disk while either preventing or forcing the conversion of the target drive to APFS. You can also use the startosinstall command to specify the target for the install.
The feature in startupinstall to specify a target isn’t documented, though it’s present in earlier versions of OS X and macOS installers. When the documentation for a command option is removed, it could indicate that the feature is deprecated, and may not be supported at some later date. For now, the feature to specify a target using the “–volume ” switch (without the quotes) seems to still be working.
To specify what drive to install macOS High Sierra on, other than the startup drive, you need to add the following to either of the Terminal command lines listed above:
— volume /path to the volume you wish to use
An example for installing macOS High Sierra on a drive named HighSierra without converting the target volume to APFS would be:
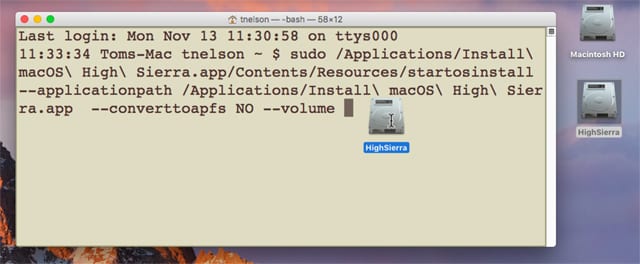
sudo /Applications/Install\ macOS\ High\ Sierra.app/Contents/Resources/startosinstall –applicationpath /Applications/Install\ macOS\ High\ Sierra.app –converttoapfs NO –volume /Volumes/HighSierra
This would force the installation to occur on a volume named HighSierra. An easy way to enter the actual pathname to the drive you wish to use is to enter the command in Terminal without the actual pathname, so the command would end after — volume (make sure there’s a space after the word volume). Now drag the drive from the Finder and drop it on the Terminal window. Terminal will add the actual pathname to the drive for you. All that’s left to do is press enter or return.
The — volume switch will also work when you wish to force a conversion to APFS, as shown in this example, which will convert the drive named HighSierra to APFS and install the new version of macOS:
sudo /Applications/Install\ macOS\ High\ Sierra.app/Contents/Resources/startosinstall –applicationpath /Applications/Install\ macOS\ High\ Sierra.app –converttoapfs YES –volume /Volumes/HighSierra
By using the startosinstall command from within Terminal, the choice to convert to APFS or leave the target drive’s format unchanged is entirely up to you.


Nope, the command doesn’t work anymore with the final High Sierra
sudo /Applications/Install\ macOS\ High\ Sierra.app/Contents/Resources/startosinstall –applicationpath /Applications/Install\ macOS\ High\ Sierra.app –converttoapfs NO –volume /Volumes/HighSierra
@Chris yes, the command was removed with the MOjave (10.14) installer, so is not longer valid.
There are two possible work-arounds:
1. a. install Mojave on another drive temporarily that you do not care if it is updated to APFS.
b. clone the that drive to your HFS+ formatted drive (using something like CCC).
2. Try out free the following: Paragon apparently has a free utility that will convert APFS volumes to HFS+ non-destructively, that is, no need to delete or lose existing data on the drive. Find it here: https://www.paragon-software.com/home/apfs-hfs-converter/
(Note: I have not tried this personally so YMMV).
seems “–volume” is not a valid Argument to use with ‘startosinstall’ (v13.4.09).
Always returns the following error:
>Usage: startosinstall
Arguments… <
Thanks for trying though!
On behalf of everyone using VMware on an ESXI environment, bless you.
The hardest part was finding the full .DMG for the High Sierra Install. After that, all of our upgrades went to APFS on accident, which meant vmware wasn’t able to expand disks or volumes after that (DARN YOU APFS).
Thank you for your tutorial.
Hi There,
A year or so ago our church bought a couple of 2011 iMacs from OWC. They both have traditional hard drives (non SSD). Can I use the Carbon Copy Cloner method you described above to update them to High Sierra without APFS?
I have a Mid 2010 Mac Pro Server (I don’t use it as a server, but thought I’d report exactly what “About This Mac” says) that has a PCI SSD that I bought from OWC years ago. I think I got it when they first became available from OWC.
System Report identifies it as a “MARVELL Raid VD 0”.
Am I safe to upgrade to High Sierra? It doesn’t matter a whole lot to me if I’m able to convert to AFPS, but I don’t want to deal with a failed install and/or having to re-install Sierra.
your instructions don’t work you get the list of arguments when specifying the volume. when I don’t specify volume I get an error about not finding OSInstallerSetup.framework
If I do this installation to get HFS+ what would happen when I do a point update, either Delta or Combo? Would that be enough to convert it to APFS?
Meowrs :)
I’ve seen the two methods listed here elsewhere, but I’ve yet to get an answer on this question: Can you use the startosinstall method when using a High Sierra *bootable* USB installer?
The reason for asking this one is because a lot of people are on either slow connections (DSL) or metered connections and can’t really afford to download the OS installer multiple times if they need to reinstall, which the current startosinstall method requires.
It seems rather silly (and a huge oversight) that Apple would prevent using these methods using the USB installers as opposed to the installer as downloaded into /Applications.
I’m also interested in learning an authoritative answer to TonyK’s question. If there’s any ambiguity then the disabling option seems desirable.
Nice to know. I will archive this article for future reference. Thank.
Useful information. Mahalo from Hawaii!!
One question: Will this startosinstall disabling-of-APFS process be required again when installing any subsequent upgrades, or is this a job-and-done until one chooses otherwise (to subsequently install APFS)?
Aloha!!
yes, but will this work with the Aura drives that previously would not install High Sierra?