

In an earlier article, we looked at 10 Mac Features You Probably Don’t Use But Should. While researching that article we came across a bit more than 10 notable Mac features, so a follow-up article was born.
This time, we have seven more Mac features that are worth checking out. On the premise that there’s no such thing as a free lunch, we’d like to know in return what favorite feature you think doesn’t get enough respect from the typical Mac user. You can add it to the Leave a Comment section, below.
Mine is Stacks, I use them all the time to quickly access the content of folders and smart folders without having to dig through the Finder to locate them, and to have them available no matter how many apps and windows are cluttering up my desktop.
Stacks
Stacks are one of my favorite features of the Mac’s Dock. At its basic level, a stack is just a folder containing items that you’ve dragged to the right-hand side of the Dock. But a stack has a few more capabilities than just a plain folder; you can view the content of a stack by clicking on its Dock icon. You can specify how the content is to be displayed, and you can specify the sorting order of the content when viewed from the Dock, independent of how you have the sorting order set when manually opening the same folder in the Finder.
To give you an idea of the power of Stacks, we’re going to create a Stack to house all the items we’ve marked using Finder Tags, as mentioned in last week’s article: 10 Mac Features You Probably Don’t Use But Should.
Open a Finder window, and scroll down in the sidebar ’til you see the Tags section.
Drag one of the tag colors from the Finder sidebar to the right-hand side of the Dock.
A new stack will be created in your Dock, which you can use to quickly view all of the items on your Mac that you’ve tagged with that specific Finder Tag color.
Stacks have a number of options you can set that control how they look and behave. To find out more about Stacks and the options available, stop by Spacers, Stacks & Swapping: Mastering the Iconic macOS Dock, Part 2.
There are other Stacks you can create in your Mac’s Dock; another favorite is the Recent Items stack. You can find instructions for creating this stack in the article: Terminal Tricks: Mastering the Iconic macOS Dock, Part 3.
Add Glyphs Directly From the Keyboard
If you use your Mac for just about any type of correspondence, sooner or later you’re likely to need to produce diacritical marks that are placed above a letter to indicate a special pronunciation. In the past, these special marks were hidden away in the in the Mac’s Character Viewer, Emoji & Symbol Viewer, or Keyboard Viewer app (the names of these special character viewer apps change depending on the version of the OS you’re using.).
The viewers can be added to the Apple menu bar:
Launch System Preferences, and select the Keyboard preference pane.
Select the Keyboard tab, and then place a checkmark in the Show Keyboard and Emoji Viewers in Menu Bar box.
You can now access the character viewers directly from the right-hand side of the Apple menu bar.
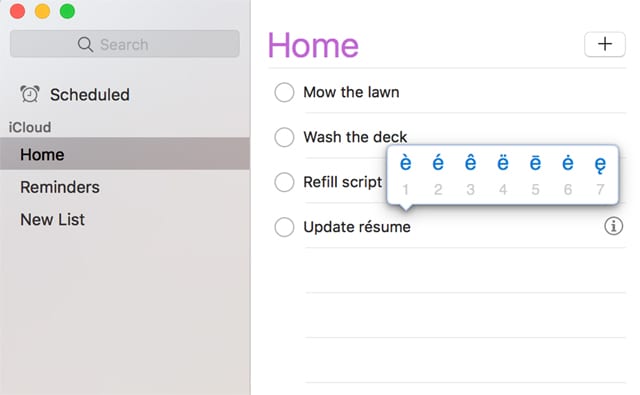
Of course, there’s an easier way if all you need to do is add the accent glyph for a single character. Ever since OS X Lion, it’s been possible to add an accent glyph by holding down the letter’s key for a second or two, at which point a popover menu will appear directly above the character, listing all of the correct diacritical marks associated with that letter. Simply click on the mark you wish to use, or type the number that appears below the mark.
If none of the glyphs are the correct one, you can hit the Escape key to dismiss the popover menu.
Finder Batch Rename
OS X Yosemite brought with it a new Finder feature that tends to get overlooked a lot: a batch renaming capability. Before Yosemite, batch renaming of files and folders was an option provided by third-party app developers.
The Finder’s batch rename system won’t have you throwing away any of those dedicated renaming apps, but for very basic use, such as incrementally renaming a group of image files your camera just dumped onto your Mac, the Finder’s basic rename feature may suffice.
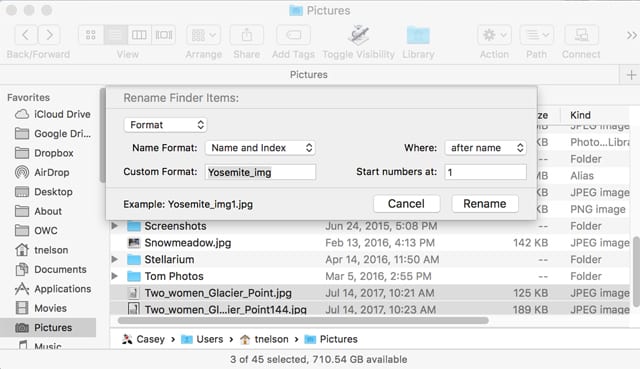
Launch the Finder and navigate to the folder containing a number of items you wish to rename.
Select the files that you want to rename; remember, you can shift-click to select a range of items, or command-click to select non-contiguous items.
With at least two items selected, right-click and choose Rename X Items from the popup menu. (The X will be replaced with the number of items you have selected.)
The Rename sheet will drop down, displaying the various available options for renaming. To add an incremental number to each item, select Format from the dropdown menu, then the type of format to use (Name and Index, Name and Counter, or Name and Date). You can specify the base name to use, if the number or data should be applied before or after the name, and what number to start the index or count with. You’ll also find an example of what the newly renamed item will look like.
When you’re ready, click the Rename button.
Automatic Spelling
In our previous article about Mac features that tend to be forgotten or overlooked, we examined Text Substitution, the ability to replace an abbreviation with an expanded word, phrase, or symbol. This week, we look at the Mac’s other key text manipulation capability: its ability to automatically correct your spelling, both on a system-wide and per-app basis.
System-Wide Spelling: Launch System Preferences and select either the Language & Text preference pane (OS X Lion and Mountain Lion), or the Keyboard preference pane (OS X Mavericks and later).
Select the Text tab. You will find the spelling options on the right-hand side of the Text window. The actual option names vary slightly depending on the version of the Mac operating system you’re using, but the following should be close enough to give you an idea of how the spelling options work.
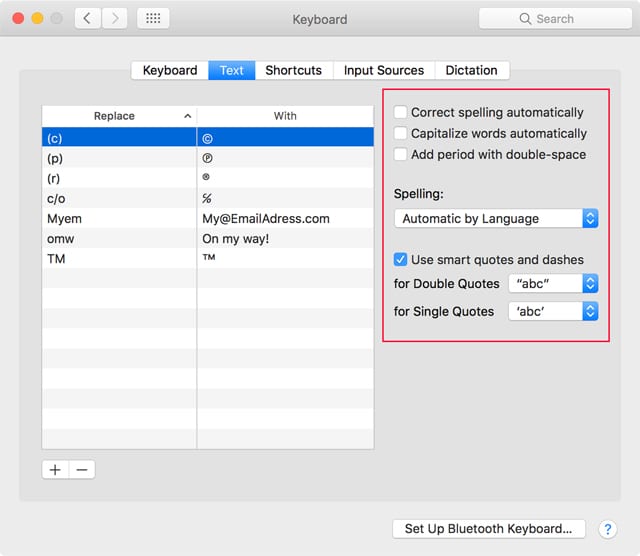
- Correct Spelling Automatically: Enabling this option will auto-correct your spelling as you type. This can be helpful or a problem, since once in a while the auto-correct function will change a word to something you never meant.
- Spelling: Use the dropdown menu to select the language to use for checking your spelling.
- Word Break: This option adjusts the rules for how a word is highlighted when you double-click on it. Standard is the normal selection, but if you’re a developer, you may wish to select English (United States, Computer), which is a better match for most programming languages. Note: This option is not available in later versions of the OS.
- Capitalize words automatically: Auto capitalizes the first word of a sentence as well as any proper nouns the Mac can recognize. This option appears in later versions of the OS.
- Add period with double-space: This option detects when you have hit the space bar twice and uses that as a signal to insert a period and a space to end the current sentence. This option is available in later versions of the OS.
- Smart Quotes: You can select from a number of smart quotes and dash styles to use. In later versions of the OS, you can also disable smart quotes by removing the checkmark from the Use Smart Quotes and Dashes box.
App-Specific Spelling: You can also set spelling options within most apps. This allows you to have different settings per app, as well as to disable auto-correct spelling system-wide while still having automatic spelling capabilities within one or more apps.
App-based spelling options vary by app, but in general, they can be configured either from the app’s Edit menu or Spelling and Grammar item, or from an app’s preference settings. In most cases, you must have an app window open where you can edit a document. As an example, in Text Edit, most Spelling and Grammar options are grayed out until a Text Edit document is opened.
Safari Tab Muting
Safari tab muting is the ability to mute the audio in Safari no matter which tab the sound is being played in. If you’ve ever opened multiple tabs on websites that are each auto-playing audio content, you’ll surely be pleased with the ability to silence them all at once with this feature.
- Mute All Tabs: In the URL bar, a speaker icon will appear on the right-hand side near the refresh button. If the speaker icon is blue, it means sounds are being played in at least one tab. Clicking on the speaker will mute the sound from all currently open tabs.
- Mute a Single Tab: The same speaker icon is also displayed within each tab in the Safari tab bar. You can use the speaker icon to mute or unmute individual tabs.
- Window Muting: This same trick works in individual Safari windows. Look for the speaker icon in the window’s URL bar.
Mouse Shakes
Ever lose the cursor location on your Mac, and then spend the next minute trying to locate it? I’m not sure if it was the advent of higher resolution displays, such as the Retina-enabled Macs, or that the folks at Apple were just aging a bit and their eyesight was about as good as mine.
No matter the reason, since OS X El Capitan, you can shake the mouse pointer and the cursor will momentarily enlarge by about 3x, making it easy to spot.
You can find the control for the mouse shake in System Preferences, Accessibility, Display.
Your only option is to enable or disable the mouse shaking option.
Hot Corners
The ability to activate a Mac feature by moving the cursor to one of the display’s corners has been around for a long time. But every once in a while, someone I’m working with will be dumbfounded when all of my open apps and their windows disappear, replaced by just the desktop, and then, just as suddenly, the jumble of overlapping windows returns.
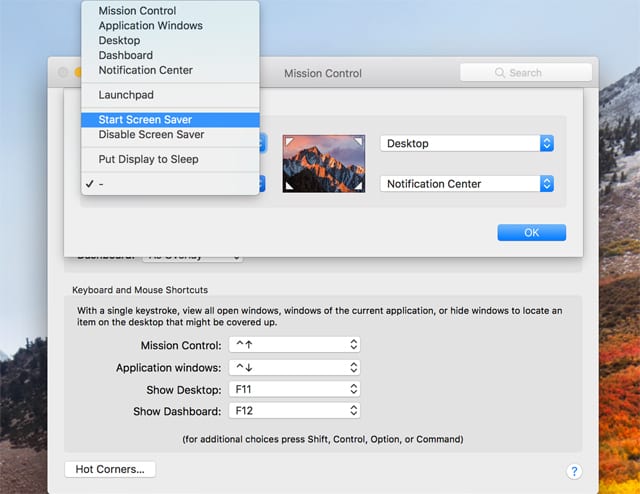
Desktop is just one of the actions Hot Corners can be used to invoke. The complete list includes:
- Mission Control: Opens Mission Control, giving you an overview of all open windows and apps.
- Application Windows: Brings all windows of the current front most app to the forefront.
- Desktop: Hides all open windows, giving you easy access to your Desktop.
- Dashboard: Brings the Dashboard and any widgets you have enabled to the forefront.
- Notifications Center: Opens the Notifications Center.
- Launchpad: Launches the Launchpad app, which lets you quickly open any apps you have installed on your Mac.
- Start Screensaver: A quick way to bring up the screensaver, as well as hide any game you may be playing when the boss walks by.
- Disable Screensaver: Keeps the screensaver from starting up.
- Put Display to Sleep: Forces the display to enter sleep mode.
You can assign any one of these actions to one of the display’s four corners.
Launch System Preferences and select the Mission Control preference pane.
Click the Hot Corners button.
A sheet will drop down, depicting your display with a dropdown menu in each corner. Use the menus to select what activity will be assigned to each corner.
When you’re done, click the OK button.
To activate, move the cursor into the appropriate corner.
That’s it for this week, but feel free to add your favorite overlooked Mac features to the comments section, below.


Disabling the SNMP Status Enable option on Windows Vista resolved my offline printer issue immediately. Your clear instructions saved the time and frustration.
Great insights into maximizing Mac features! Exploring these tips has definitely enhanced my productivity—thanks for sharing such useful information!
Apple is 0perating just like Boeing Aircraft. Make changes that benefit Apple, then advise the loyal users…..but only if they catch the change.
It’s been possible to add an accent glyph by holding down the letter’s key for a second or two, at which point a popover menu will appear directly above the character, listing all of the correct diacritical marks associated with that letter.
ipadsupportnumber.com/blog/fix-apple-application-support-error-2/
How about an article showcasing the downsides of upgrading to High Sierra?!!
My #1 reason is the abysmal state of printer drivers. For example, HP laser drivers which worked for years thru many OSX versions are broken with HS – and there’s no solution in sight except to toss your perfectly good home or office printer & replace it with a current model that has a HS driver. This isn’t an issue with Windows.
NO, Gutenprint isn’t acceptable because it doesn’t support a # of functions like stacker-stapler, higher resolutions, RET, trays and economy mode toner. Our excellent P4015X is a case in point.
I thought my Canon iP4000 printer was not working after upgrading to High Sierra, but somehow I got it working again. I added it again to the Printers&Scanners preference list. I had done an upgrade to High Sierra instead of a Clean install. I do see that the Print Queue and the Printers&Scanners list show it as “not connected” or Offline respectively, but in fact I can print to it and use the Utility functions (test print, ink levels, etc) and its status changes to In Use but goes back to Offline once the operation is finished. Maybe your HP printer can also be made to work again similarly.
I have another early 2011 MacBook Pro, SN C02GH2E4DRJL, completely stock. I want to upgrade-it’s slow!
I already know the Hard Drive needs to be replaced. What do I need to upgrade the RAM, or anything else for that mattter, to improve speed???
The problem with using tags for a stack is if you have an online back up both copies will show up and you have to look carefully to make sure you don’t edit a backup rather than the current file.
I don’t know if you’ve covered this before but, “Clippings,” I use constantly as my hands do not type well anymore. They’re snippets to store and drag the icon to the cursor position that’s in edit mode for automatic paste. Very handy.
Great, but how to type the Weighted arithmetic mean symbol (X-bar) as shown here?
Weighted arithmetic mean
tse2.mm.bing.net/th?id=OIP.Dl3KKIBwr7WaOj9oDTcLNAEsEs&pid=Api&w=180&h=181
Thanks for the additional list. I had forgotten how to add diacritical marks. Perhaps that’s because I’ve got PopChar, wherein I have the most common keystrokes in my favorites list. But if I can remember to hold down a key, I can find the mark even more quickly.
As for correcting spelling, I prefer to have a word underlined so I can choose to correct it by hand. I know this is slower, but having words corrected automatically is annoying—for me, anyway. As well, having a word underlined rather than corrected makes it easier to add a word to the dictionary, which I do frequently. For short cuts I use TypeIt4Me, which has been under active development since Mac OS 7.
For batch renaming files I use Name Mangler.
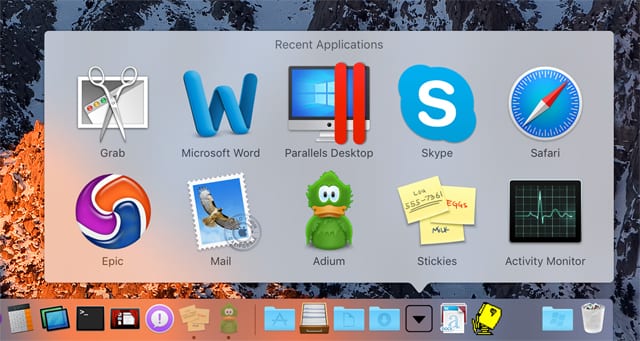
Also, I think I’ll give Stacks a try with my most recent applications.
As for Mission Control, I try to remember the keyboard shortcuts rather than using the hot corners, which I tend to enter inadvertently—so I don’t want them hot. But, of course, like the others, this is personal preference. I’m not saying one is any better than another. Except for one: Mute All Tabs. That is the most important innovation in Safari since they introduced Tabs many years ago, following the competition, not leading it, sad to say.
I sometimes remember to shake the mouse when I want to find the cursor, but that one will take more practice.
Any, thanks for the list.