 There are many features of the Mac that are often overlooked by new users, or simply forgotten about by those who have been using Macs for a while. In some cases, the feature is used once when setting up a Mac, and then vanishes from memory; other times, the feature is never stumbled upon. No matter the reason, this collection of six “forgettable” Mac tips deserves to be remembered.
Customize Icons
Icons, those little images that represent apps, documents, folders, drives, and a few other items, are used extensively throughout the Mac’s interface. They’re most prominent in the Dock, in the Finder, and on the Desktop.
Personalizing your Mac by using custom icons can add a bit of flair as well as allow you to better organize your Mac’s file system. Apple already provides custom folder icons for the Applications folder, Documents folder, Downloads, Movies, Music, Pictures, and a few others, but most of the folders on your Mac will use generic folder icons. The same is true for storage devices mounted on your desktop, and files on your Mac.
You can replace a file, folder, or drive icon with one of your own making, or one acquired from the many websites that specialize in Mac and Window icons, many of which are free.
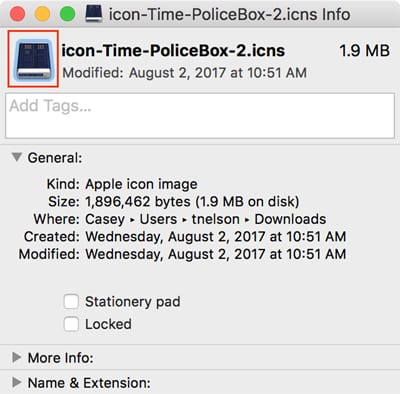
One of the simplest ways to change an icon is to copy/paste an icon using this tip:
Right-click or control-click on the icon you wish to copy, and then select Get Info from the popup menu that appears.
In the Get Info window that opens (the window will be in the upper left corner of your display and may be hidden by other windows), you’ll see a thumbnail icon in the top left corner.
Click or tap once to select the thumbnail, then select Copy from the File menu or hit the command + C keys on your keyboard.
The icon will be copied to the Mac’s built-in clipboard.
Find the file, folder, or drive icon you wish change.
Right-click or control-click on the icon.
In the Get Info window that opens, click or tap the thumbnail icon to select it, then use Paste from the File menu, or command + V on the keyboard, to paste the icon from the clipboard onto the selected item.
That’s the easy way to copy/paste icons from one source to a new destination. But what if you want to create a custom icon from scratch?
We’ve got you covered with Create Your Own Custom Icons.
Other World Computing also has a webpage full of drive icons you’re welcome to use. You’ll find them at: Custom Drive Icons.
Change the App That Opens a File
Document files on a Mac are associated with a default application that knows how to open and use the type of data contained in the file. For example, if you create a Word document, your Mac knows that if you double-click the document file, Word should be launched to allow you to view the content of the file.
Sometimes, however, the file type is wrong, or you would rather use a different app to open that file type from now on. Perhaps you’ve replaced Word with Pages, and want all your old documents to automatically open in the new app.
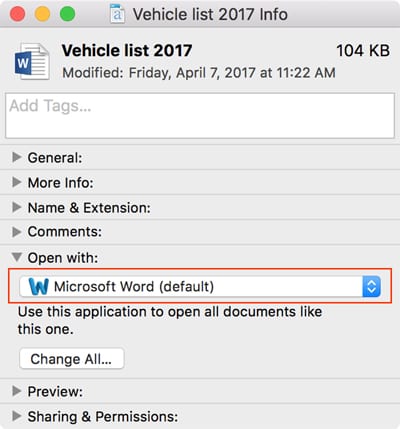
This tip will change the default app associated with a specific file type:
Right-click or control-click on the document whose default app for opening you wish to change.
Select Get Info from the popup menu.
In the Get Info window, locate the Open with: section. It may need to be expanded by clicking the chevron next to the word Open.
The current default app associated with the file type will be displayed in the dropdown menu. Select the dropdown menu to see a list of apps that can be used in place of the current default app.
If the app you wish to use isn’t listed, try selecting Other, and then locate the app you wish to use manually.
Once you’ve selected a new app, it will become the default for opening the single document you originally selected.
If you wish to have all documents with the same file type (file extension) open with the new app you chose, click the button labeled Change All.
Dock Tricks, Including Adding Spacers
The Dock is my favorite method for launching and switching between apps. But it can get crowded and sometimes disorganized. One way to get around the clutter is to group similar app icons together and, if needed, add a spacer to help separate the group from your other Dock icons.
You’ll find all things Dock in the two-part Rocket Yard guide:
- Tech 101: Mastering the Iconic macOS Dock, Part 1
- Spacers, Stacks & Swapping: Mastering the Iconic macOS Dock, Part 2
Finder’s File Lock and Stationery Pad
The Finder has two simple methods for protecting a document file from being changed: the Lock feature and the Stationery Pad method. Both prevent a document file from being accidentally changed, but are used a bit differently.
First up: the Stationery Pad. This feature allows you to create document templates that can be used over and over again, without worrying about them accidentally being changed in the process of editing.
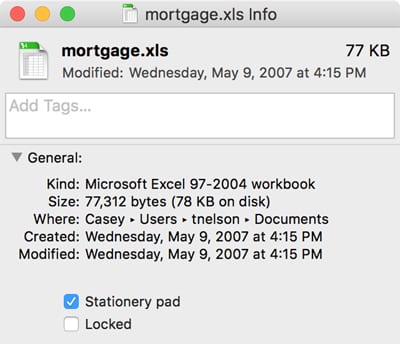
The process is simple enough: you create the template using an appropriate app. Once the template is created, you use the Finder to set the file as a Stationery Pad. Once it becomes a Stationery Pad, it can’t be used directly. Instead, when you double-click a Stationery Pad, the Finder creates a copy of the file and then opens the app using the copy. This ensures the original is never altered.
You can read more about creating Stationery Pads in the Rocket Yard guide: Quick Tip: Protect Original Files with Finder’s Stationery Pad.
Next up: Locking files. The Finder can also lock a file, preventing the file from being written to by any app. This is an effective way to keep the data in a file intact, and still allow the data to be used. Locked files can still be opened by apps, but in a read-only mode. You can make edits to read-only documents, but to save the file you must use the app’s Save As command to save the file under a different name, thus preserving the content of the original file.
To lock a file, double-click or control-click the file you wish to lock.
In the popup menu that opens, select Get Info.
In the General section of the Get Info window, place a check mark in the box labeled Locked.
Add an Electronic Signature to a Document
From time to time you’re likely need to sign a document. This usually involves printing the document, physically signing it, and then sending the document through the postal system to its destination.
If the entity needing a signed document will accept it, your Mac can let you electronically sign and send the document via email, a much easier process for all involved, and a great deal speedier, too.
You can create an electronic signature using the Preview PDF app included with the Mac. The signature can then be added to a PDF document using the markup tools included with Preview. The markup tool also works with a number of other apps and document formats beyond PDFs, most notably image file formats, which can help you out if an app you’re using for a document doesn’t support Apple’s markup tools directly. You can instead take a screenshot of the document, which converts it to an image, and then use the markup functions.
You can find out more about creating signatures and using the markup tools in:
Managing the Menu Bar
The menu bar is that small strip at the top of your display that contains the Apple menu, and the currently active app’s menus, such as File, Edit, View, Windows, and Help. While the menu elements listed above all reside on the left hand side of the menu bar, there’s another section to the far right that contains elements that are independent of the currently active app. These can include the Notification Center, Siri, User List, and Date & Time. You may also find Volume, Wi-Fi, Bluetooth, and Time Machine, and that’s just some of the system status menu items you might see.

The right-hand side of the menu bar can also hold third-party menu items, commonly referred to as widgets. Many apps will install a menu bar widget that may make using the app more convenient.
Over time, the Menu bar can become downright crowded with widgets that you may no longer be using. Here’s how to get them under control:
1) Remove Unwanted Menu Bar Widgets
Place your cursor over the menu bar item you wish to remove.
Hold down the command key.
Hold down the left mouse or trackpad button, and drag the menu item out of the menu bar onto the Desktop.
Release the left mouse or trackpad button.
The menu bar item will disappear.
Most of the time, menu bar items supplied by Apple, and actively providing system status, may need a different technique:
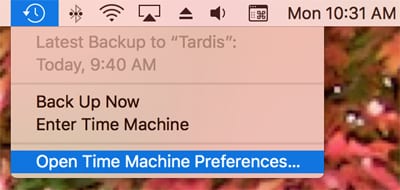
Click the menu bar item you wish to remove, and select Open XXX Preferences. The XXX represents the name of the system preference that is associated with the menu bar item. Example: If you want to remove the Date & Time item, it would say: Open Date & Time Preferences.
Once the associated system preference opens, look for an option to show a menu bar item. Remove the checkmark from that option.
2) Rearrange Menu Bar Widgets
Most menu bar items can be rearranged, though a few, such as the Notification Center, have dedicated positions. To move menu bar items around, follow these steps:
Hold down the command key.
Move the cursor to the item you wish to move.
Press and hold the left mouse or trackpad button while dragging the item to a new location in the menu bar.
Once it’s in its new place, release the mouse or trackpad button.
3) Remove Unwanted Menu Bar Widgets
Many of the system preferences offer the option to be included in the menu bar. To add such preferences, open the system preferences and look for the option to add a menu bar item.
To add a third-party app to the menu bar, you’ll need to check the app’s preferences (usually, App’s menu, Preferences) for an option to display a menu bar widget. You may also consider reinstalling the application to allow it to place a widget in the menu bar.
There’s also a secret collection of menu bar extras installed on your Mac that can be added to the menu bar. You’ll find the extras at:
/System/Library/CoreServices/Menu Extras.
Within the Menu Extras folder, you’ll find the menu items used by the various system preferences, as well as a few additional ones that may be of interest, such as:
- Eject: An easy way to eject a CD or DVD, or to open the tray of an optical storage device.
- SafeEjectGPUExtra: Allows you to safely eject an external GPU from your Mac. By using the Safe Eject menu item, you ensure your Mac goes through the formal disconnect steps for the GPU unit.
- Script: This menu item will open the script editor that can be used with AppleScript and Automator, as well as UNIX shell scripts.
- VPN: If you make use of a Virtual Private Network, the VPN menu item can make the task of managing the connection easier.
Double-clicking a Menu Extra will install the menu bar item.




Thank you so much. I removed a menu bar item installed by a printer that I didn’t want and tried everything I could think of to get rid of. 2 seconds and it was gone.
How do I make itunes mp3 files I copy and paste to the desktop have familiar Black icons like in 10.9.5 ? or even match my current itunes 12.8 dock icon ?
Currently running 10.13.6
For managing my menu bar, I’ve resorted to using Bartender 3. It’s an excellent little app that enables me to keep all my icons under control, yet not have too much clutter. Not free, but worth the $, IMO.
I personally hate the dock; I always have. My favourite way to switch to another application (or open one) has, for over 20 years, been short cuts. First there was Now Utilities, which then became Action Utilities, and now I use Keyboard Maestro. I used to customise icons, so I might find a use for this again, and I often use the command-I shortcut to enable me to change the app with which to open a particular kind of file. Thanks for all these tips, though; it’s always good to be reminded!
There is an even easier way to get that custom icon on something. Instead of going through all the hassle of copy/paste, just drag the actual .icns file itself onto the portrait square in the Get Info window. It’ll then not only give you the custom icon, but all of the available sizes for it so you can scale it. All without having to copy and paste. Just drag and drop and you’re good to go.
Brilliant! I’ve been a Mac user (and occasional developer) since 1987 and I did not know that. It never occurred to me to try it either. Thanks for that.