

Today in the 12 Days of Backups, we’ll show you how to back up an iPhone, iPod touch or iPad to a Mac or PC using iTunes. Yesterday’s post showed how to do a backup using macOS Finder for those who are running macOS Catalina, Big Sur, or Monterey. For those running Mac OS X or macOS versions 10.14 Mojave or earlier, iTunes is your tool for backing up a mobile device. It’s also the way to back up an Apple mobile device to a PC running Windows.
Why would I back up to my Mac or PC instead of iCloud?
Not everybody wants to back up their iPhone or iPad to iCloud, which is why backing up to your Mac or PC can be a good idea. For example, let’s say that you don’t want to spend the money for iCloud storage, or you’re on a very slow Internet connection that makes it impossible to back up to the cloud. Saving device data to a computer regularly ensures continuity if your mobile device must be reset.
Requirements
To use iTunes to back up your iPhone or iPad, you must be running macOS 10.14 Mojave or earlier, or a Windows PC running iTunes. Older versions of macOS and Mac OS X use iTunes for a variety of purposes. The newer versions divided iTunes up into Music, Podcasts, and TV, while the mobile backup function moved to the macOS Finder.
You’ll also need a USB to Lightning (iPhone, iPod touch, iPad) or USB-C to USB-C (iPad Pro) cable to connect the device to your Mac or PC.
Connecting to the Mac or PC for an iTunes backup
Now we have the computer running an older version of Mac OS X or macOS, or it’s running Windows. Here we go!
1. Launch iTunes.
2. Connect the iOS or iPadOS device to the computer using a Lightning or Dock Connector cable.
3. Any content purchased downloaded from the iTunes or App Store on the iOS device should be transferred to the Mac or PC. To begin transferring, select File > Devices > Transfer Purchases from the menu bar (see image below). On PCs, a File menu may not be visible, in which case holding down the Ctrl and B keys simultaneously should help. Allow the purchased content to finish transferring to the Mac or PC.

Backing up health and activity data with iTunes
Next, we’ll back up Health and Activity data from the iOS device or a connected Apple Watch.
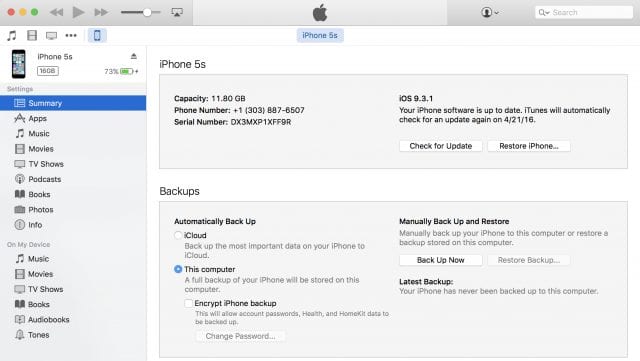
4. To begin, encrypt the data. Select This Computer, and then check the Encrypt Data box (see image below). If asked for a password, make it memorable. The backup will not be accessible without the password.
Begin the iTunes backup
If no Health or Activity data needs to be backed up, ignore step 4. Now you’re ready to start backing up your data.
5. Click Back Up Now, and the backup begins. Once again, if your running Windows and a File menu doesn’t appear, holding down Ctrl-B should fix the problem.
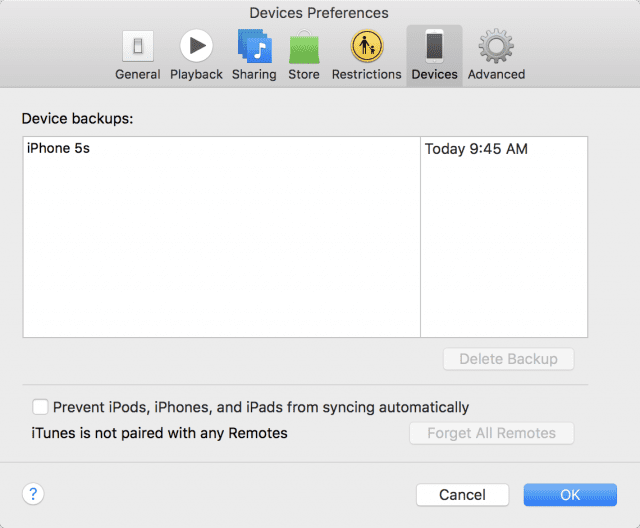
6. Once the device is done backing up, make sure the process was completed successfully. Open iTunes Preferences and click on the Devices button. You’ll see the name of the device along with the date and time of the backup. Encrypted backups show a lock icon to the right of the device name.
Although these instructions show Mac screens, the Windows version of iTunes presents an almost identical user interface.
To delete any previous device backup, select it with a click, then click Delete Backup.
Related Topics
This article is part of our 12 Days of Backups series that began on December 27, 2021 and ends in January, 2022.
- The First Day of Backups – Time Machine
- The Second Day of Backups – Third-party Mac Backup Apps
- The Third Day of Backups – MacBook Backups with the OWC Envoy Pro FX
- The Fourth Day of Backups – iMac Backup with the OWC Mercury Elite Pro
- The Fifth Day of Backups – Mac mini Backup with the OWC miniStack STX
- The Sixth Day of Backups – Mac backups for photographers
- The Seventh Day of Backups – Online backup solutions for Mac
- The Eighth Day of Backups – iCloud backup for iOS and iPadOS
- The Ninth Day of Backups – Mobile backups to your Mac with macOS
In addition, you may wish to check out these other articles about iTunes:


