 1-800-275-4576
OWC 14-Port Thunderbolt 3 Dock
Support Manual
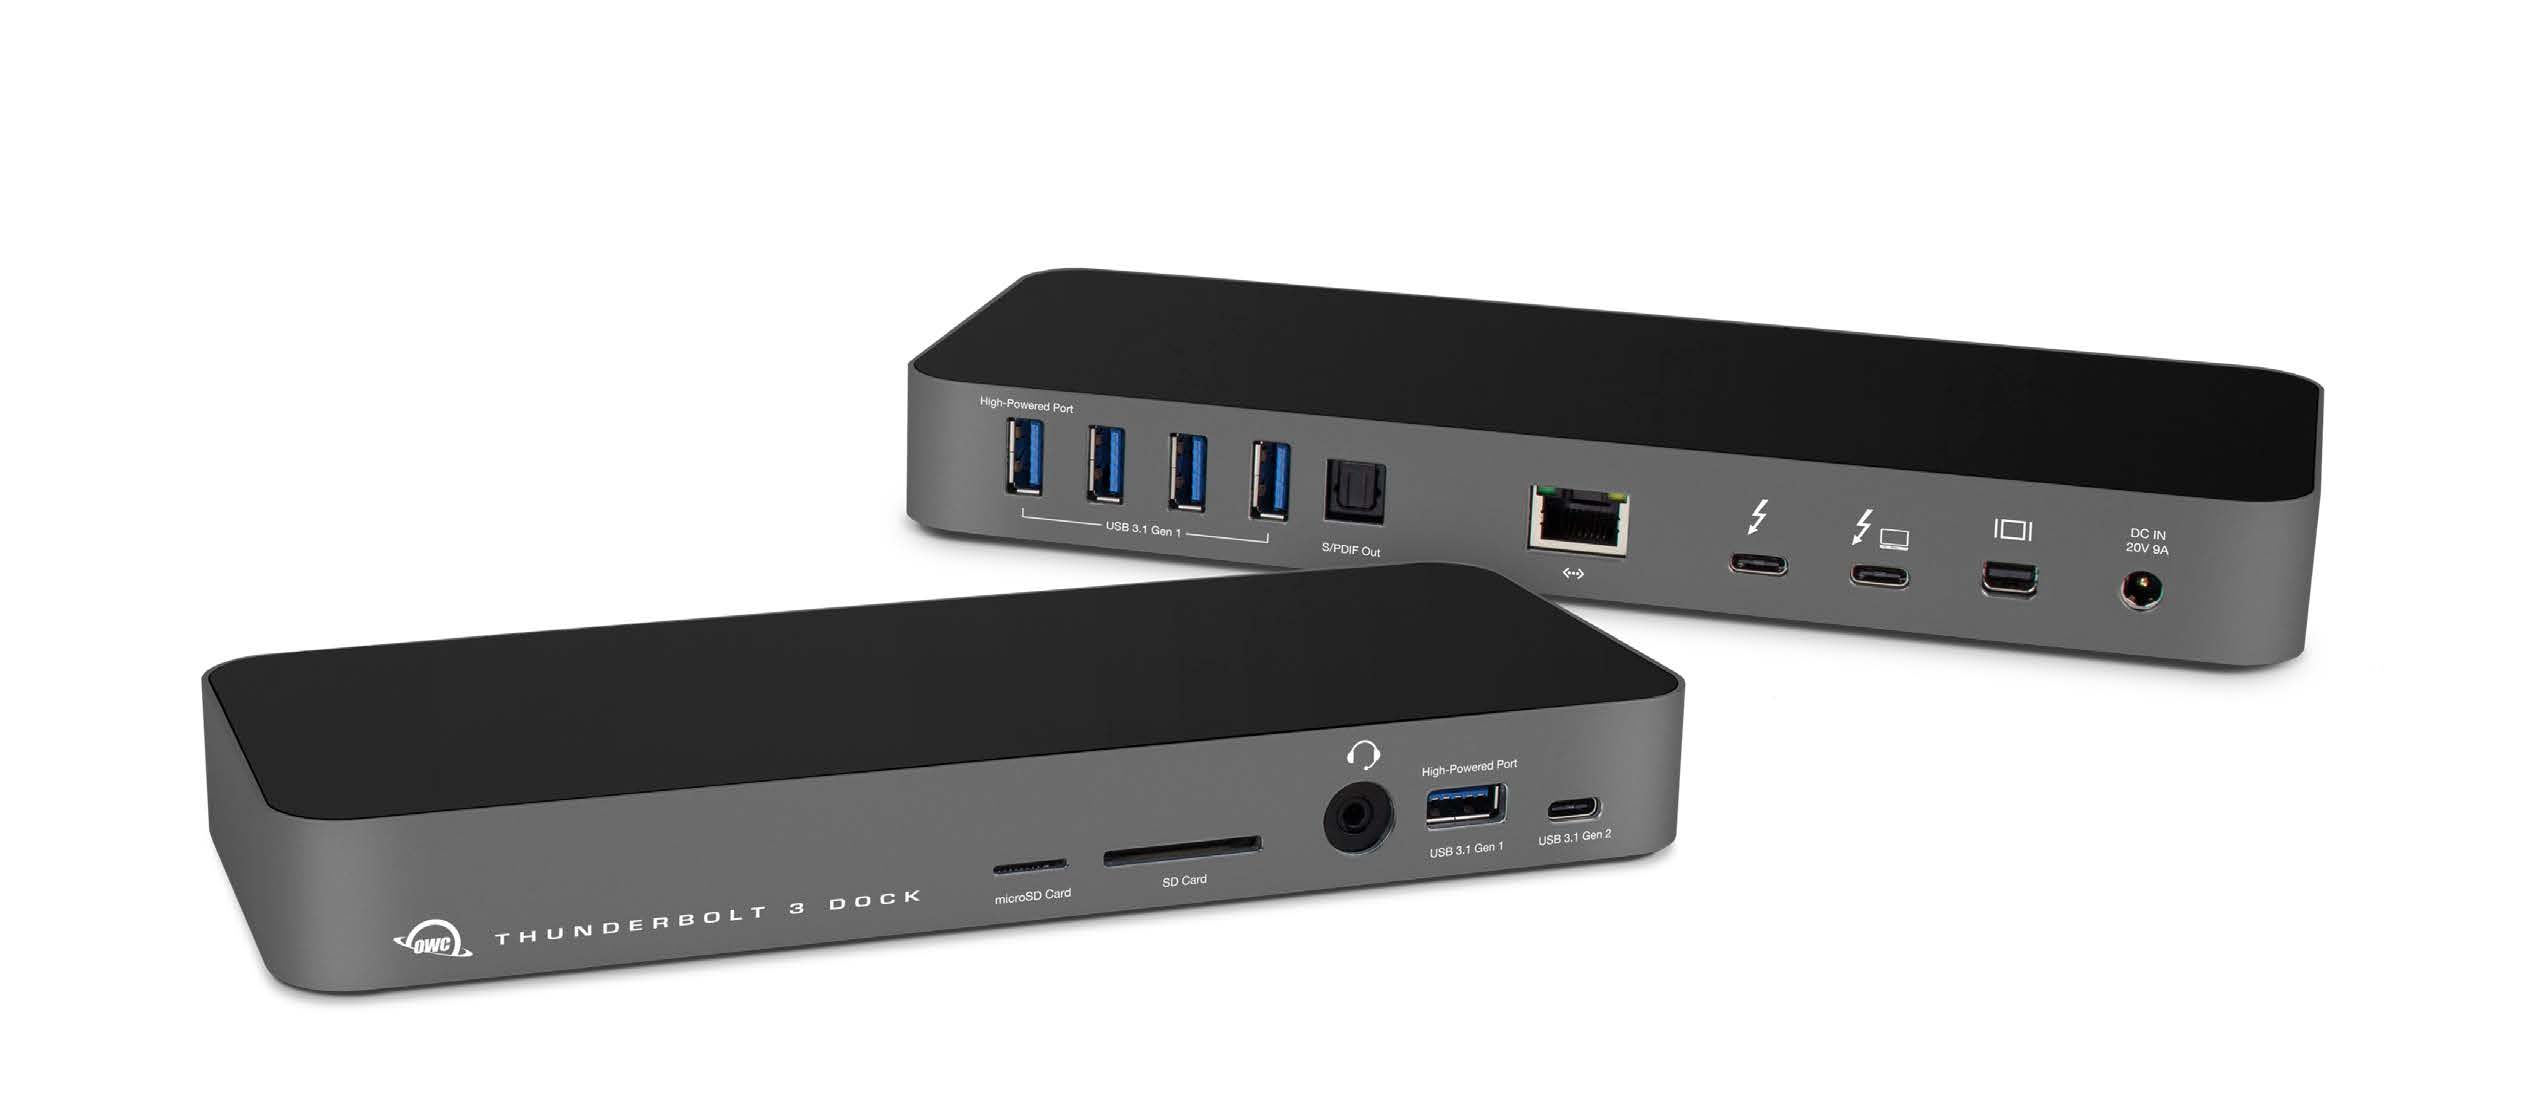
Angled aerial view of two OWC Thunderbolt 3 Docks. One facing forwards and backwards to illustrate the cosmetics of the dock and available ports. From left to right, the front of the dock shows the device name accompanied by an OWC logo, a microSD card slot, a SD card slot, a combo audio port, a USB 3.1 Gen 1 Type-A USB port, and a USB 3.1 Gen 2 Type-C port. The back of the dock shows four USB 3.1 Gen 1 Type-A ports, a SPDIF port, an Ethernet port, two Thunderbolt ports, a miniDisplay port, and a DC power input port. The sides of the dock are dark gray, and the top of the dock is black.
Introduction
1.1 System Requirements
Operating System
- macOS 10.12 or later
- Windows 10 or later
Hardware
- Works with any Mac or PC with Thunderbolt 3
Supported Flash Media
- SD & Micro SD cards
1.2 Package Contents
- OWC Thunderbolt 3 Dock
- Thunderbolt 3 cable
- Power supply and cable
1.3 Front View
Note: There are two LEDs on the bottom of the OWC Thunderbolt 3 Dock near the front, which are not pictured. Their functionality is described below.
- Data LED (green) — This LED glows green when the dock has an active data connection to a computer via the Thunderbolt cable. If the computer is powered off or in sleep mode, this LED will power off.
- Power LED (blue) — This LED glows blue when the dock receives power. Unlike some Thunderbolt devices, the Thunderbolt 3 Dock does not power off when disconnected from the computer or when the computer sleeps. As long as the dock receives power, the blue power LED will remain on.
- microSD card slot — Accepts microSD media cards.
- SD card slot — Accepts SD type media cards.
- Combo audio port (3.5 mm) — Accepts microphones, headphones, and headsets.
- High-power USB 3.1 Gen 1 port — Connect compatible USB devices via Type-A connector.1
- USB 3.1 Gen 2 port (Type-C) — Connect compatible USB devices via Type-C connector.
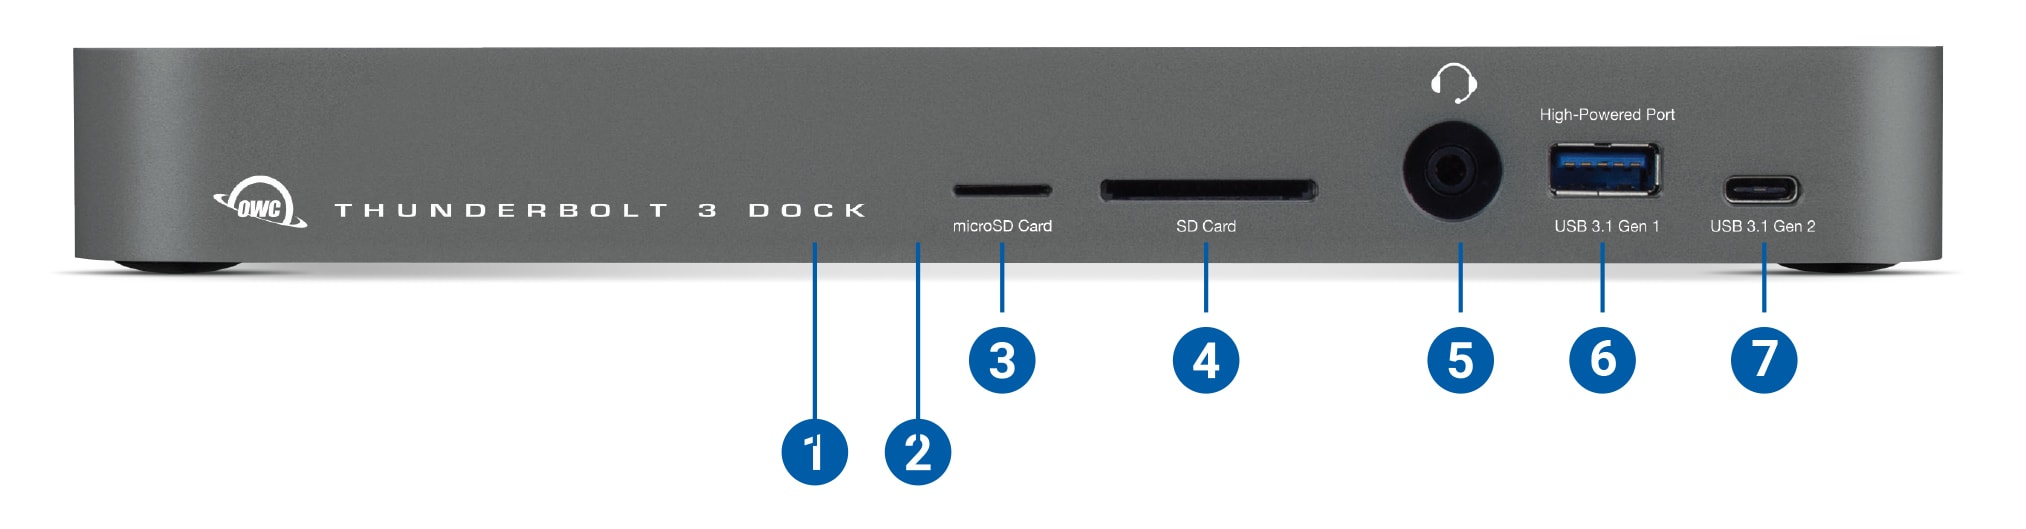
A magnified presentation of the OWC Thunderbolt 3 Dock front view to illustrate and detail the available ports. The ports have number call outs that correlate with the descriptions. From left to right, the front of the dock shows the device name accompanied by an OWC logo, two LED lights beneath the dock labeled with blue numbers 1 and 2, a microSD card slot labeled with a blue number 3, a SD card slot labeled with a blue number 4, a combo audio port labeled with a blue number 5, a USB 3.1 Gen 1 Type-A port labeled with a blue number 6, and a USB 3.1 Gen 2 Type-C port labeled with a blue number 7. The ports are marked on the dock in white lettering and symbols.
*USB High-Powered Ports
These USB 3.1 Gen 1 ports are each capable of providing up to 1.5A of power for charging devices such as the Apple iPad. These ports are otherwise identical to the USB 3.1 Gen 1 ports located on the rear of the dock.
Important
A driver is required to enable support for the Apple SuperDrive, the Apple USB keyboard, and for iPad 1/2/3 charging.
1.4 Rear View
- USB 3.1 Gen 1 ports — Connect additional USB devices via Type-A connectors here. Left-most port is a high-power port.1
- S/PDIF Digital Audio port (output only) — Connect S/PDIF device here.
- Gigabit Ethernet port — Connect an Ethernet cable here to access a wired network.
- Thunderbolt 3 ports — Connect one port to the Thunderbolt 3 host; you must connect to the dedicated Power Delivery port (right) to charge the host. Use the extra port to connect up to five additional Thunderbolt devices, plus a display. Thunderbolt 3 supports DisplayPort 1.2 over USB-C. See Section 3.3 Usage Notes.
- Mini DisplayPort — Connect your display here. This connection supports DisplayPort 1.2. See Section 3.3 Usage Notes
- DC power input — Connect the included power supply here.
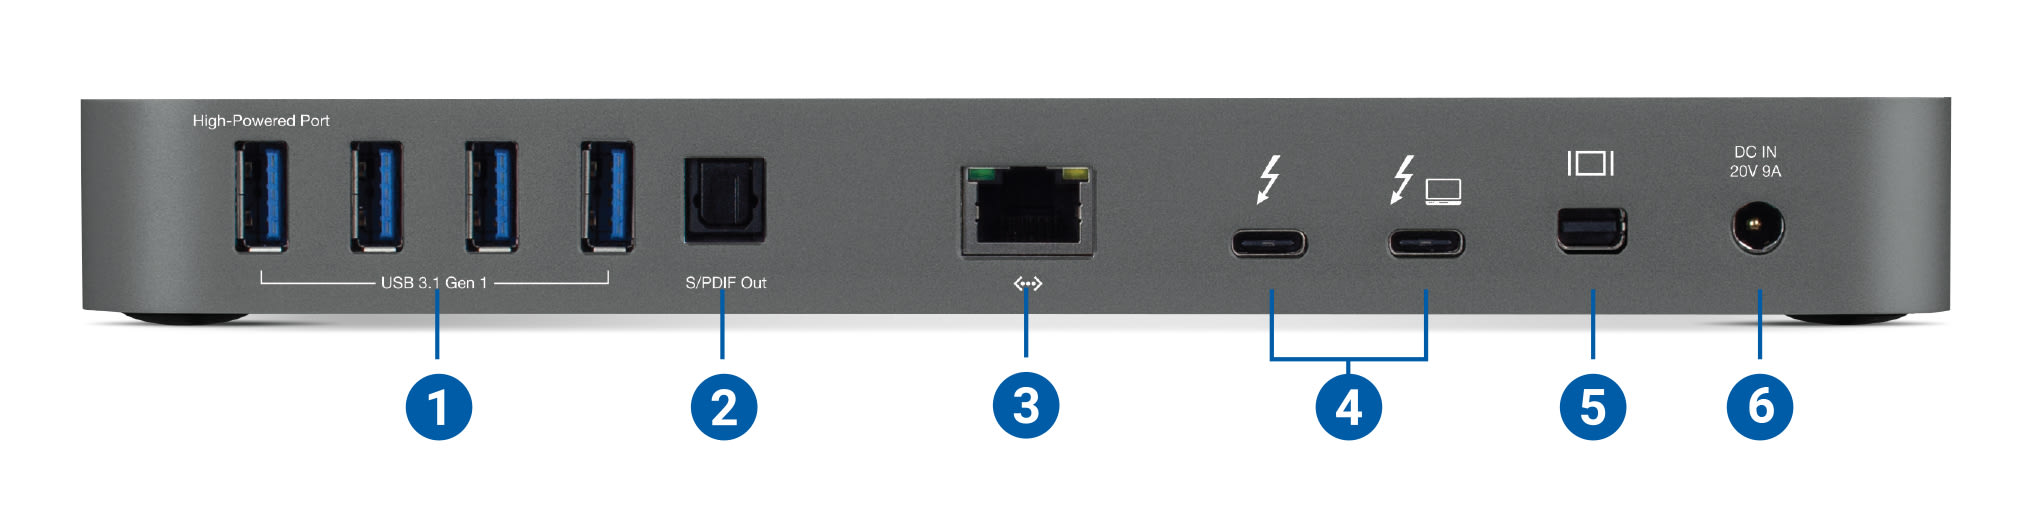
A magnified presentation of the OWC Thunderbolt 3 Dock back view to illustrate and detail the available ports. The ports have number call outs that correlate with the descriptions. From left to right, the back of the dock shows four USB 3.1 Gen 1 Type-A ports labeled with a blue number 1, a SPDIF port labeled with a blue number 2, an Ethernet port labeled with a blue number 3, two Thunderbolt ports labeled with a blue number 4, a miniDisplay port labeled with a blue number 5, and a DC power port labeled with a blue number 6. The ports are marked on the dock in white lettering and symbols.
* USB High-Powered Ports
These USB 3.1 Gen 1 ports are each capable of providing up to 1.5A of power for charging devices such as the Apple iPad. These ports are otherwise identical to the USB 3.1 Gen 1 ports located on the rear of the dock.
Important
A driver is required to enable support for the Apple SuperDrive, the Apple USB keyboard, and for iPad 1/2/3 charging.
Getting Started
2.1 Device Setup
- Connect the Thunderbolt 3 Dock to power using the included power supply and cable.
- Connect the dock to a Thunderbolt 3 port on your computer using either one of the Thunderbolt ports on the dock.
- Connect other devices to the appropriate ports on the dock. All connected devices will be available immediately for use on your computer
Device Management
3.1 OWC Innergize Software
A software application included with OWC Atlas media cards that currently provides three basic functionalities to the user: Health, Sanitize and Field Firmware Upgradability.
- The Health function allows the user to know how much life is left on their OWC Atlas media card
- Sanitize removes ghost data on OWC Atlas media cards which will allow the media cards to perform at their peak and out of factory condition performance in matter of seconds
- Field Firmware upgradability allows OWC to deliver live updates to our memory cards without the hassle of sending them in for an update.
Installing OWC Innergize
- Download OWC Innergize application based on the system:
- Open the downloaded Innergize.dmg file to begin and complete the installation process.
- For additional information regarding OWC Innergize please consult the support manual "OWC Innergize User Guide"
Required Firmware Update
OWC Innergize requires a firmware update to work properly with select OWC Memory Card Readers, Docks, and Storage Solutions.
- Ensure the OWC Thunderbolt 3 Dock (14-Port) is powered and connected to a compatible system with the included data cable.
- Insert an OWC Atlas SDXC memory card into the SD Media Slot of the OWC Thunderbolt 3 Dock (14-Port). Align the memory card notches with the internal card reader connections. The gold contacts should be facing left when the memory card is inserted. This allows the system to recognize the card reader.
Windows Users
- Download the OWC Innergize Firmware Update for the OWC Thunderbolt 3 Dock (14-Port).
- Access the system Downloads folder and open the downloaded Compressed Folder. The compressed folder will open showing a firmware updater folder, and PDF/Word instructions for completing the firmware update process. Before accessing the firmware updater folder, open the instructions and proceed through the provided steps.
Mac Users
- Additional steps are required to complete the installation of the firmware. The firmware update is completed through the Windows operating system, therefore a Windows operating system emulator “Parallels” will need to be downloaded.
- For additional information regarding the OWC Innergize for Mac firmware update please consult the support article based on the system: "Innergize for Mac: Firmware Update".
3.2 Unmounting Drives
To ensure no data is lost during normal use, always eject or unmount the corresponding disk(s) from your operating system before powering off the device. Unmounting options are provided below.
OWC Dock Ejector
This application safely ejects all drives connected to the OWC ThunderBay Flex 8 with a single click, adding peace of mind to fast-paced mobile workflows. To install this app, please follow the steps below.
- Download the installer file for Mac: go.owc.com/dockejector
- Launch the installer and follow the prompts. No restart is required.
- Once the app is running an icon like the one shown below will appear in the macOS menubar. Clicking on the icon will provide options to unmount the OWC ThunderBay Flex 8.
- Full user manual can be viewed by visiting go.owc.com/dockejector/manual
Manually Unmounting Drives
macOS
- Drag the icon for the disk you wish to unmount to the trash can; OR
- Right-click the disk icon on the desktop, then click “Eject”; OR
- Highlight the disk on your Desktop and press Command-E.
3.3 Usage Notes
General Usage
- Thunderbolt 2/Thunderbolt compatibility requires a certified Thunderbolt 3 (USB-C) to Thunderbolt 2 (mDP) adapter and a Thunderbolt 2 cable (not included). This configuration provides data transfer at up to 20Gb/s but does not support notebook charging.
- Both the SD card reader and the micro SD card reader are controlled by the same chipset. This means that only one can be in use at a time.
- Thunderbolt 3 is capable of supporting up to two external displays from a single system host port dependent on the host system’s capability. Thunderbolt 3 external display support includes up to two 4K displays @ 60Hz, or one 5K display @ 60Hz.Display support, including available resolution and refresh rates, is dependent on host hardware and drivers.
- Please review the Apple silicon External Display Support support article for more details regarding performance how many external displays can be connected to an Apple silicon Mac system.
- The rear-facing Thunderbolt (USB-C) port supports USB connectivity up to 10Gb/s. The front-facing USB-C port supports USB connectivity up to 8Gb/s.
- Connected drives may display the wrong desktop icon and not be ejectable through Dock Ejector when connected over the (2) rear-right-side USB 3.1 Gen 1 Type-A ports.
- OWC Dock Ejector is developed for OWC products. Third party hubs and docks are not supported.
- Recorded sound input playback will be quiet. Adjusting the input volume in System Preferences does not improve the softness of the recording playback. Connecting the desired input directly into the computer system will improve the recorded sound input.
- A firmware update is required to use OWC 14-Port Thunderbolt Dock with OWC Innergize software. Please consult the "Innergize for PC: Firmware Update" or "Innergize for Mac: Firmware Update" guide for download and installation instructions.
- SD cards inserted into the OWC 14-Port Thunderbolt Dock will not be recognized by Windows Disk Management or applications after being safely removed. Power cycle the entire OWC 14-Port Thunderbolt Dock by disconnecting the power source. This will allow the OWC 14-Port Thunderbolt Dock to create a new card session resulting in Windows recognizing the SD card.
- Mac Users: A software driver is required to enable Apple Super Drive, Apple USB Keyboard, and for charging iPad generations 1, 2 and 3. This driver is included in the OWC Dock Ejector software download package. If your SuperDrive doesn't respond when connected to an external display or USB hub, connect your SuperDrive to a USB port directly on your Mac.
- UltraStudio Recorder 3G is not compatible with OWC Thunderbolt Hub. System Report will show the device being connected; however, the driver won’t load which doesn’t allow for use of the device. UltraStudio Recorder 3G works properly when directly connected to a system.
- Connected Thunderbolt and USB connected external drive solutions may remain powered on for a short duration of up to 10 minutes when the host system is asleep/powered off or when the dock/hub is physically disconnected from a system. Connected external drive solutions may get warm as they remain powered on. The temperature remains within a normal operation range and has no short or long-term effects on the device, drive, or performance.
- OWC Envoy Pro Elektron and OWC Envoy Pro FX devices remain powered on when the host system is asleep/powered off or when the dock/hub is physically disconnected from a system. These devices may get warm as they remain powered on however, the temperature remains within a normal operation range and has no short or long-term effects on the device, drive, or performance.
- OWC Envoy Pro Elektron, OWC Envoy Pro FX, and OWC Express 1M2 external drive solutions will mount as an internal drive when connected to an Apple silicon system through the OWC 14-Port Thunderbolt Dock. Devices perform within normal operation range and don't impact performance.
Performance Notes
- For the USB Type-A ports on the back of the device, connecting to only one of them will allow for maximum performance. As you plug in additional USB devices to the other ports, the bandwidth will be shared among them.
- The USB Type-A port on the front shares bandwidth with the audio port and the media card readers. For the best performance with this USB port, make sure you are not using the audio port or media readers at the same time.
- The USB-C port on the front does not share bandwidth with other ports and has a maximum throughput of ~8Gb/s.
- When working with media cards, it is not possible to use both readers at the same time.
Support Resources
4.1 Troubleshooting
Begin your troubleshooting by verifying that the power cable is connected to the OWC Thunderbolt 3 Dock and to a power source. If the power cable is connected to a power strip, make sure that the power switch on the strip is turned on. Next, verify that both ends of the Thunderbolt 3 cable are properly plugged into the computer and the dock. If the dock is still not working properly, try using a different Thunderbolt cable or using another Thunderbolt port on the computer or the dock. You can verify if the dock is communicating with the computer by opening System Information and clicking on the ‘Thunderbolt’ category in the sidebar. If the dock is seen by the computer but one or more connected devices are not, troubleshoot each device individually. If problems persist, please contact OWC Support.
4.2 Contacting Support
4.3 About This Manual
The images and descriptions may vary slightly between this manual and the unit shipped. Functions and features may change depending on the firmware version. The latest product details and warranty information can be found on the product web page. OWC’s Limited Warranty is not transferable and
General Use Precautions
- To avoid damage, do not expose the device to temperatures outside the following ranges:
- Environmental (Operating)
- Temperature (ºF): 41º — 95º
- Temperature (ºC): 5º — 35º
- Environmental (Non-Operating)
- Temperature (ºF): -4º — 140º
- Temperature (ºC): -20º — 60º
- Environmental (Operating)
- Always unplug the device from the electrical outlet if there is a risk of lightning or if it will be unused for an extended period-of-time. Otherwise, there is an increased risk of electrical shock, short-circuiting, or fire.
- Protect your device from excessive exposure to dust during use or storage. Dust can build up inside the device, increasing the risk of electrical shock, short-circuiting, or fire.
- Do not block any ventilation openings on the device. These help to keep the device cool during operation. Blocking the ventilation openings may increase the risk of electrical shock, short-circuiting, or fire.
Safety Precautions
- Use proper anti-static precautions when handling this device. Failure to do so can increase the risk of electrical shock or short-circuiting.
- Never expose your device to rain, or use it near water, or in damp wet conditions. Never place objects containing liquids on the device, as they may spill everywhere and into the openings. This will increase the risk of electrical shock, short-circuiting, fire, or personal injury.
- To avoid any risk of electrical shock, short-circuiting, fire, or dangerous emissions, never insert any metallic object into the device.
- Please cease use of the device and contact OWC Support if it appears to be malfunctioning.
Terms & Conditions of Sale
Warranty
The OWC 14-Port Thunderbolt 3 Dock has a 2 Year OWC Limited Warranty. For up-to-date product and warranty information, please visit the product web page.
Changes
The material in this document is for information purposes only and subject to change without notice. While reasonable efforts have been made in the preparation of this document to assure its accuracy, OWC, its parent, partners, affiliates, officers, employees, and agents assume no liability resulting from errors or omissions in this document, or from the use of the information contained herein. OWC reserves the right to make changes or revisions in the product design or the product manual without reservation and without obligation to notify any person of such revisions and changes.
FCC Statement
Warning! Modifications not authorized by the manufacturer may void the user’s authority to operate this device.
NOTE: This equipment has been tested and found to comply with the limits for a Class A digital device, pursuant to Part 15 of the FCC Rules. These limits are designed to provide reasonable protection against harmful interference when the equipment is operated in a commercial environment. This equipment generates, uses, and can radiate radio frequency energy and, if not installed and used in accordance with the instruction manual, may cause harmful interference with radio communications. Operation of this equipment in a residential area is likely to cause harmful interference, in which case the user will be required to correct the interference at his own expense.
NOTE: This equipment has been tested and found to comply with the limits for a Class B digital device, pursuant to Part 15 of the FCC Rules. These limits are designed to provide reasonable protection against harmful interference in a residential installation. This equipment generates, uses and can radiate radio frequency energy and, if not installed and used in accordance with the instructions, may cause harmful interference to radio communications. However, there is no guarantee that interference will not occur in a particular installation. If this equipment does cause harmful interference with radio or television reception, which can be determined by turning the equipment off and on, the user is encouraged to try to correct the interference by one or more of the following measures:
- Reorient or relocate the receiving antenna.
- Increase the separation between the equipment and receiver.
- Connect the equipment to an outlet on a circuit different from that to which the receiver is connected.
Copyrights and Trademarks
© 2019 Other World Computing, Inc. All rights reserved. OWC and the OWC logo are trademarks of New Concepts Development Corporation, registered in the U.S. and/or other countries. Apple, Mac, mac OS, and SuperDrive are trademarks of Apple Inc., registered in the United States and other countries. Thunderbolt and the Thunderbolt logo are trademarks of Intel Corporation in the U.S. and/or other countries. Microsoft and Windows are either registered trademarks or trademarks of Microsoft Corporation in the United States and/or other countries. Other marks may be the trademark or registered trademark property of their owners.
No part of this publication may be reproduced, stored in a retrieval system, or transmitted in any form or by any means, electronic, mechanical, photocopying, recording or otherwise, without the prior written consent of OWC.
Free Support Chat
Our free award-winning support team is ready to answer all of your questions. Technical support is available Monday - Friday: 9AM - 6PM. Customer Support & Sales is available Monday - Friday: 9AM - 6PM. Support is unavailable on U.S. Federal holidays. Talk to a human today.