![]() Our Macs are amazing tools, but they lack one thing that iOS devices have — cameras that can be used almost anywhere to take high-resolution photos. Sure, you could theoretically hold a document to be scanned in front of an iMac’s FaceTime camera or have the family pose for a photo as you hold your MacBook, but both of those actions are awkward. macOS Mojave has a feature called Continuity Camera that lets you use your iPhone or iPad as a very portable camera or scanner for your Mac. In this quick guide, we’ll show you how Continuity Camera works in Mojave and just how useful it really is.
Our Macs are amazing tools, but they lack one thing that iOS devices have — cameras that can be used almost anywhere to take high-resolution photos. Sure, you could theoretically hold a document to be scanned in front of an iMac’s FaceTime camera or have the family pose for a photo as you hold your MacBook, but both of those actions are awkward. macOS Mojave has a feature called Continuity Camera that lets you use your iPhone or iPad as a very portable camera or scanner for your Mac. In this quick guide, we’ll show you how Continuity Camera works in Mojave and just how useful it really is.
What Do You Need for Continuity Camera?
First, your Mac must be running macOS 10.14 Mojave or a newer version of the Mac operating system. Next, your iOS device must be running iOS 12 or newer. Finally, make sure you have the latest updates of Apple’s apps. Most apps that can feature inserted images now work with Continuity Camera, including Pages (version 7.2 or newer), Numbers (version 5.2 or newer), Keynote (version 8.2 or newer).
Apps that are part of Mojave — including Mail, Notes, Messages, and TextEdit (when creating or editing a Rich Text file) — also have the ability to use Continuity Camera.
At this time, we don’t know of any third-party apps that make use of Continuity Camera, but as Mac developers find how useful the feature is we’re likely to see their apps adding it.
How To Use Continuity Camera
As mentioned in the introduction to this article, Continuity Camera allows Mac users to use an iOS device as a camera or scanner to enter photos or document scans directly into Mac apps. In this example, we’ll use the feature to make a scan of a document — in this case a user manual for a drone controller — and embed that scan directly into an email.
After addressing the email and adding a subject, click on the small photo browser button in the upper right corner of the email composition window — it’s the button that looks like a stack of photos, and it’s outlined in red in the screenshot below.

Notice that the menu that is displayed shows not only an item for looking at the Photos Library, but also has listings for four different iOS devices that are associated with this user’s Apple ID. For each device, there are two choices: Take Photo and Scan Documents.
Take Photo does exactly that; when selected from the menu, the iOS device launches the Camera app and is ready to take a photo. Once the photo has been taken and the user taps on “Use Photo” on the Camera screen, the image is inserted at the cursor point in the Mac Mail draft.
This can be useful in all sorts of situations where you need to take a photo of something and have it inserted into a document. Think of a report about treasures in an art museum — as you write about a painting or sculpture, you take a photo of it and it’s inserted into the Pages document. Any situation where you may need to document something with both text and images is perfect for Continuity Camera.
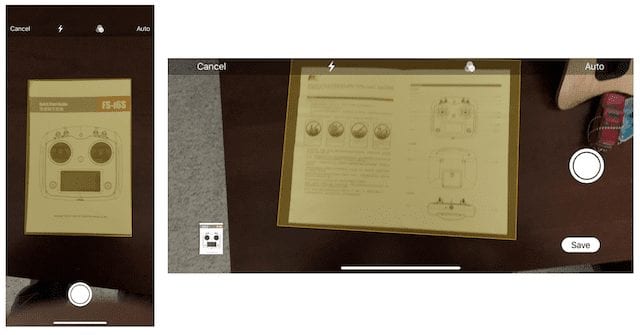
Scan Documents is a very powerful part of Continuity Camera. When selected, the chosen iOS device launches the Camera in the same Notes scanner mode that was introduced with iOS 11. Aiming the camera at a document, the “scanner” selects the borders of the document and then automatically takes a photo, straightening the edges where necessary. It then allows the user to capture additional pages, and once complete, turns the scanned pages into a PDF file.
For example, we’ll take a manual for a drone radio controller and insert it into an email. Selecting one of the iOS devices and “Scan Documents”, the “scanner” opens on the iOS device and shows a yellow box around the document to be scanned (screenshot below, left). When the scanner determines that the document is ready to be captured, it takes a phone and then prepares for the next page. This can be repeated until the end of the document is reached, at which time tapping “Save” (screenshot below, right) assembles the PDF and inserts it into the email as a file named “application-x.pdf” (where x is a number assigned by macOS).

Continuity Camera isn’t something that everyone will use or even understand the usefulness of at first, but it’s a perfect example of how the devices in Apple’s ecosystem can work together to make life easier for everyone.
More Mojave Coverage:
- Mac 101: How to Get Ready for macOS Mojave
- How to Download macOS Mojave and Avoid Common Problems
- Mojave Upgrade Vs. Clean Install: Which is Right for You?
- Mac Installation Errors You May Encounter and How to Fix Them
- Mess Up Your Desktop with 6 of Our Favorite ‘Hidden’ macOS Mojave Features
- A Guide to New Features in the macOS Mojave Safari Browser
- Stacks on Stacks: A Guide to macOS Mojave’s Simplest New Desktop Feature
- A Guide to macOS Mojave’s New Screenshot Tool
- A Guide to Quick Actions in macOS Mojave


It seems to need both devices logged into the same iCloud account?
It took me a while to figure that out, by getting Airdrop to work for ‘Contacts’ not ‘Everyone’ … same applies?