[Update: Now that you’ve downloaded it, check out what Mojave broke and how to fix it]
One of the first steps in installing macOS Mojave is acquiring the Mojave installer from the App Store. While this is generally an easy process, it can have a few twists and turns that can leave you frustrated.
In this guide, we take a look at:
- How to download the macOS Mojave installer
- Problems you may encounter, including how to convert from beta testing to using the release version
- Other issues you may experience
Before you start downloading, you should check to see if your Mac is able to run Mojave. You will find all the information you need in the Rocket Yard Guide: How to Get Ready for macOS Mojave.
![]()
How to Download Mojave
The Mac App Store is the primary host for macOS Mojave, and it’s likely that the new OS will be prominently displayed under the Featured tab. But finding the macOS Mojave tile at the top of the Mac App Store window isn’t guaranteed, especially immediately after Mojave is launched or down the road, when the release of macOS Mojave is yesterday’s news.
You’re much more likely to find macOS Mojave listed in the Quick Links area of the Featured section, either with its own link to the download page, or by using the Apps Made by Apple link. And of course, you can always use the App Store’s Search field if Mojave isn’t showing up in the expected places.
To find macOS Mojave, launch the Mac App Store by selecting the App Store icon in the Dock, or by selecting it from the /Applications folder.
The App Store window will open. Click or tap the Featured button in the toolbar if it isn’t already highlighted.
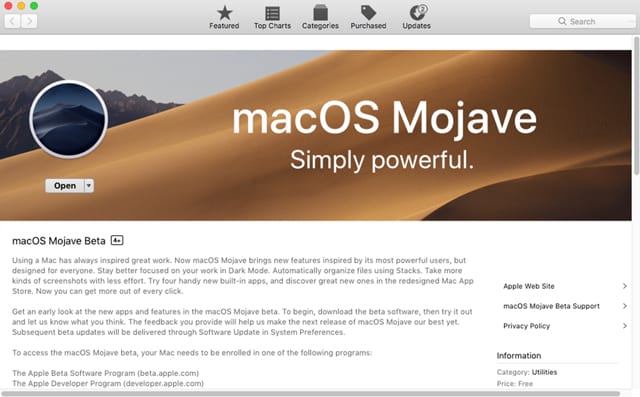
There’s a good chance that macOS Mojave will be the featured item, displaying prominently at the top of the window. You may also see a button labeled Download directly on the tile; if so, clicking or tapping the button will start the download process.
If you don’t see the download link on the tile featuring macOS Mojave, click or tap the tile to bring up the description page. You’ll find the Download button near the top left. Click or tap the button to start the download process.
When the downloading process is complete, a file called Install macOS Mojave will be present in your /Applications folder. The Mojave installer will also automatically start up once the download is completed. At this point, we suggest you quit the installer in order to perform some housekeeping chores before you start the installation of macOS Mojave.
How to Download from the New Mac App Store
If you’ve been testing the Mojave beta on your Mac, you’ve probably already discovered the Mac App Store has undergone a substantial update. If you haven’t peeked at the Mac App Store lately, go ahead and launch it, just to get your feet wet.
Because you’re already running macOS Mojave (in the beta form), you won’t see the new OS as a download option in the new Mac App Store. Instead, you’ll be able to update your beta copy to the Gold Master (GM) version using System Preferences. We’ll touch on how to download the GM version in a bit, but first a bit more about the new App Store.

The new App Store uses a two-pane interface, with a sidebar on the left and a larger pane on the right. The sidebar contains seven primary categories into which all apps in the store are sorted. When a new macOS version becomes available, you’ll see it promoted in the Discover category. This also happens to be the default category that’s displayed when you launch the App Store.
When you see an app such as a new version of macOS displayed, you can click or tap on its tile to bring up the description page. The Download button has been replaced with one that either shows the price for the app or, if it’s a free app such as the macOS, displays the word Get. Clicking or tapping the price button will change the button text to Buy App; clicking or tapping the Get button will change the button text to Install.
You’ll need to click or tap the Buy App or Install button to start the download process.
Download Mojave with Beta Version Already Installed
If you’ve been running the macOS Mojave beta, you have two choices for upgrading to the release version of Mojave. If you’ve been running the Mojave beta in a separate partition, volume or external drive, you can simply return to your normal non-beta startup drive and download the release version of macOS Mojave from the Mac App Store.
If you wish to keep using the beta, you can update the beta to the GM version using System Preferences.
Before you start the update process, make sure your startup disk is set to the volume you’re using for the beta.
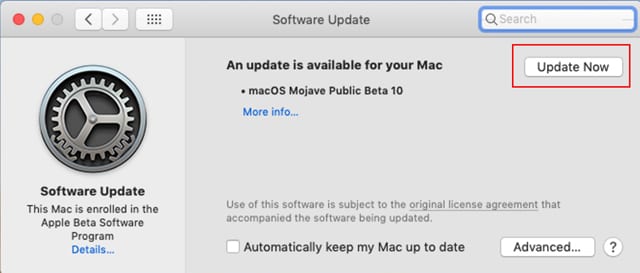
Launch System Preferences by selecting the System Preferences icon in the Dock, or by selecting System Preferences from the Apple menu.
In the System Preferences window, select the Software Update preference pane.
The Software Update preference pane will check to see if the OS is up to date. If it isn’t, you’ll be shown the option to update the macOS to the latest version. To start the download and update process, click or tap the Update Now button.
Are You Only Seeing Beta Update Options?
It may seem like once you’ve enrolled in the macOS beta program, you’re stuck, destined to only have beta versions of the macOS offered to you. Thankfully, leaving the beta program is an easy process; it’s just not that obvious.
When you joined the Apple beta program, you signed up with your Apple ID. But you also assigned one or more Macs as beta platforms. This has allowed you to select the Macs of which you have control to participate in the beta, or to be shielded from beta software.
Because of the two-step beta process, you don’t need to leave the beta program; you just need to un-enroll the Mac from participating in it.
If you’re booted up in macOS High Sierra or earlier, you can un-enroll your Mac using these steps:
Launch System Preferences by selecting the System Preferences icon in the Dock, or selecting System Preferences from the Apple menu.
Select the App Store preference pane.
Around the middle of the App Store preference pane you’ll see a line of text that reads: “Your Computer is set to receive beta software updates.”
To un-enroll your Mac, click or tap the Change button.
If you’re booted up in macOS Mojave, follow these steps to un-enroll:
Launch System Preferences by selecting the System Preferences icon in the Dock, or selecting System Preferences from the Apple menu.
Select the Software Update preference pane.
Wait for the Software Update preference pane to check for any updates. Once it finishes its check, you’ll notice the following text in the bottom left side of the window: “This Mac is enrolled in the Apple Beta Software Program.”
Following the text line will be a button labeled Details. Click or tap the Details button.
A sheet will drop down, asking if you wish to restore the default update settings. Selecting the Restore Defaults button will un-enroll the Mac from the beta program, allowing you to receive normal non-beta updates to the macOS.
Create an Install Image
This next step is optional, but recommended. Creating a bootable macOS Mojave install image on a USB flash drive will allow you to perform clean installs of the macOS; that is, install on the existing startup drive by first erasing the drive and then installing macOS Mojave. This, of course, causes a complete loss of all data on the startup drive, including any apps, documents, mail, media libraries or other data you may have contained on the drive. Think of it as starting over from scratch.
A bootable installer doesn’t have to be used only for clean installs; you can also use it for standard upgrade installs. This allows you to upgrade multiple Macs without having to download the macOS Mojave installer to every Mac you intend to update.
The bootable installer is also a good way to store the Mojave installer should you ever need to use it again in the future.
The Mojave installer has a built-in utility to create a bootable installer on a flash drive; all you need is a USB flash drive of 8 GB or larger.
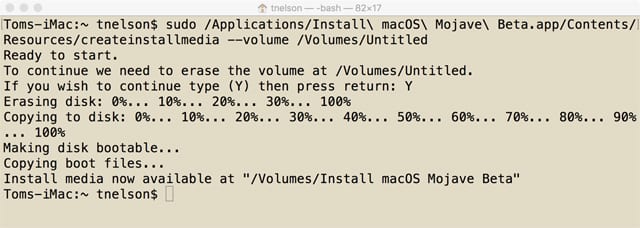
Warning: The process will completely erase any data on the flash drive.
You can use the step-by-step guide in: Rocket Yard Guide: How To Make a macOS Sierra USB Installer Drive.
Although the guide was written for macOS Sierra, it will work for macOS Mojave as well. Just remember that the installer name is “Install macOS Mojave” and not “Install macOS Sierra Public Beta.”
You can also use either of the following apps if you’d rather not fiddle with Terminal:
- DiskMaker X, once it has been updated to work with macOS Mojave
or
- Install Disk Creator, which is already compatible with Mojave
RAID Installs
macOS Mojave does not support installation on software-based RAID arrays that were created with AppleRAID (the RAID system included in Disk Utility) or SoftRAID. AppleRAID and SoftRAID arrays are still supported in macOS Mojave as data arrays when formatted with HFS+ but not as APFS boot disks.
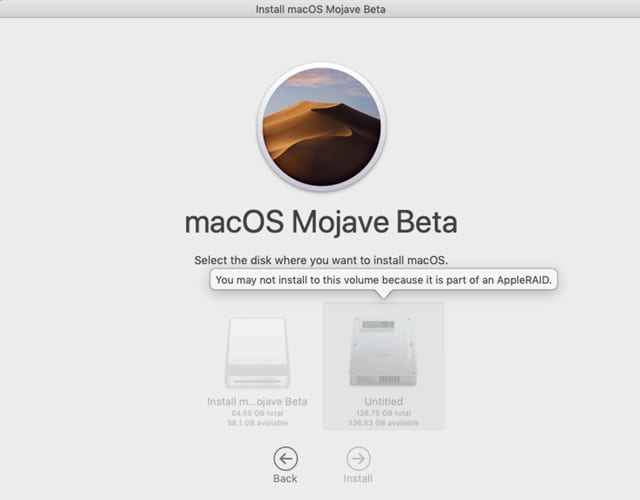
The problem stems from AppleRAID not supporting APFS. Since the startup volume is converted to APFS format by the Mojave installer, the RAID array will fail if the install is allowed to proceed.
I recommend that you either migrate the data on a RAID array you used for startup to a standard volume, or install Mojave to a new standard startup volume.
In either case, be sure to have a backup of the RAID array before installing macOS Mojave.
If you’re using SoftRAID, the newest version, 5.7 (a free update for version 5 users), supports Mojave and I recommend that you upgrade before installing macOS Mojave. SoftRAID is planning support for APFS formatted RAID arrays in version 6, which the developers expect to release later in the year.
Other Mojave Resources
- Mac 101: How to Get Ready for macOS Mojave
- Mac Installation Errors You May Encounter and How to Fix Them
- Mess Up Your Desktop with 6 of Our Favorite ‘Hidden’ macOS Mojave Features
- A Guide to New Features in the macOS Mojave Safari Browser
- Stacks on Stacks: A Guide to macOS Mojave’s Simplest New Desktop Feature
- A Guide to macOS Mojave’s New Screenshot Tool
- A Guide to Quick Actions in macOS Mojave
Installing macOS Mojave
Looking for guides for the clean and upgrade install processes for macOS Mojave? Check out this aritcle: Mojave Upgrade Vs. Clean Install: Which is Right for You?






complete CRAP. IT doesn’t work. THERE’S NO FREAKIN download button.
MAC SUCKS
Why does Apple make it so difficult to do basic computing tasks.
Ah crap, I didn’t know about the SoftRAID incompatibility until I tried upgrading. One would think it would detect this scenario and issue a warning considering it’s the only software RAID setup they (Apple) has ever supported :(
Nice post. Really Technical. Also read MacOS Mojave Problems and how to fox them here techpp.com/2018/09/28/macos-mojave-problems-fixes/
saw a “update to Mojave now available for this Mac” in the top right corner. clicked it to go to the download page. clicked download and got the “update not available for this Mac” message….
seems like Mojave is not even compatible with itself yet.
Beware, beware. There are always problems when Apple upgrades the OS. I have already been receiving notices from some of my music software companies saying “Don’t do it – XXX is not compatible with Mojave. Wait until we revise the software for compatability.”
My comment has disappeared again. Problem not solved.
I see your comment on my end, so let me get you the info you’re looking for.
It finally showed up. I guess I have to wait awhile for it to happen. Just reloading the page doesn’t bring it up.
That’s a good question and while I am pretty sure of the answer, we won’t know for sure until the September 24th release of macOS Mojave. In the meantime, this is my guess based on how the beta/release versions have worked historically:
Apple will release a GM (Gold Master) version of the beta, probably as early as this weekend, maybe as late as Monday. Usually, the GM is the final beta and will be identical to the release version, although once in a blue moon a bug is discovered in the GM and a GM2 will be released. The point is, the last GM version that is released will be the same as the general release version.
If you have the beta, and an update to the GM version, you’re running the same OS as the release version, so there’s no reason to download and install the release version. The only issue you’ll run into is that you’re still on the beta update distribution list and will only see beta updates in the Software Update system. You can fix that last issue by un-enrolling your Mac from the beta, as outlined in the article.
If you did decide to download and install the release version, you would use the standard upgrade install method to update your beta to the release version and keep all your user data intact. You would still need to un-enroll from the beta to ensure you’re seeing the non-beta software updates.
And of course, don’t perform any software updates without first creating a current backup. Remember, we’re only speculating on how the update will work; until it’s released, we can’t be 100 percent sure.
Tom N.
I’m only enrolled in the public beta program and don’t expect to get the gold master, though I’ll have to check for that. I’m currently running Mojave on a test platform, not on my main system, though the test includes a clone of my system. But thanks for the warning to un-enroll from the beta program.
Well, Tom, I downloaded the release version of Mojave and I have an answer to my questions. It would not install over either the APFS version of the beta or on an HFS+ partition (YMMV). So I had to erase and reformat both partitions, clone my system (again) onto one HFS+ partition, install Mojave on one partition, which was converted automatically by the installer to APFS, and clone it back to the other HFS+ partition. The reason for the copy is that APFS doesn’t work as well on a hard drive as HFS+ does.
Even so, the release version works better on the hard drive than any of the betas did. I was only on the public beta program so I haven’t received an update for several weeks. Nor did I get the golden master. So I’m still running it on a test platform. I won’t be willing to risk my primary system to the upgrade for a while yet, until I’ve tested it more thoroughly.
Do you know if the release version of Mojave will install over the beta, or do we need to do a clean install?
Jumping the gun a bit? Nowhere in this article does it say that general availability for Mojave isn’t until 9/24.
It’s not yet available in the App Store, at least it isn’t for me. Maybe because I am not running a beta?
You’re right, macOS Mojave will not be available until September 24th. But we’re only jumping the gun in the sense that we want to have the information available before the day it is needed.
Tom
Personally I appreciated knowing some of the points in this article before I installed the release version of Mojave on my test platform—which turned out to be a real chore, as I described above. I know some of the issues because I’ve been testing the beta, but there’s almost always something more I can learn. I used to read Macworld for this kind of information, but they’ve fallen on hard times and don’t cover Mac issues as thoroughly as they used to. The Rocket Yard blog has since become my goto source for Mac news and information. There are other good sites, of course, like TidBITS, but most of my favorites have gone by the board or, as is the case with Macworld, been corrupted by a wash of advertisements. Which is also why I post here so often. I actually get to dialog with the authors, something else Macworld has abandoned.
I don’t mind the modest number of adverts I get from OWC because I’ve been buying from them for well over a decade anyhow and found most of their products to be reliable, their warrantees good and their tech support and customer service to be excellent. Best in class, in fact. Oh, and sometimes they have sales on items I need as well.
By the way, though this post may seem a bit of a brown-nose, I don’t hesitate to criticize them if I think they are mistaken or have left something important out. Usually, though, I just find myself amplifying the discussion when my experience suggests such additions. Other times, as I did here, I have a question or two.
So I hope OWC will continue supporting this blog.