
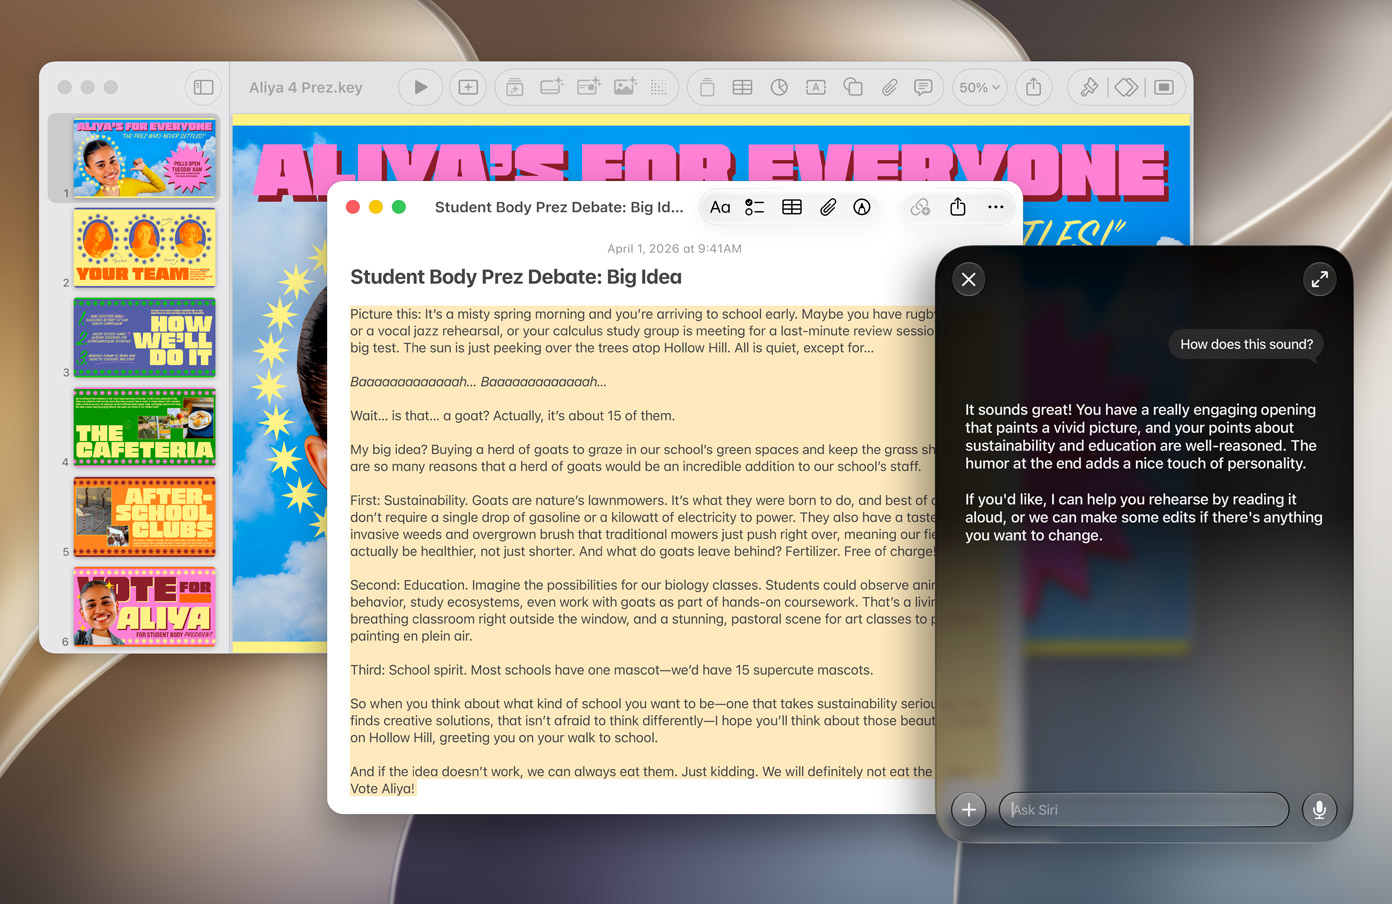
After three rounds of developer betas, Apple has released the first public beta of macOS 27 Golden Gate. Like Apple’s other OS 27 releases on iPhone and iPad, macOS 27 Golden Gate’s headline features are the new Siri AI, performance improvements, and thorough refinements to the Liquid Glass design language.
I’ve personally had this beta on my primary Mac since the first developer beta and my experience with it has been flawless. And I’m not alone. Reviewers who’ve spent time with the beta are already comparing it to Mac OS X Snow Leopard, a release remembered fondly for its focus on optimizing performance and fixing bugs rather than piling on a bunch of flashy new features.
Here’s what’s new with Golden Gate, why it might be worth your time, and two ways to install it: directly on your Mac, or risk-free on an external drive.
What’s New in macOS 27 Golden Gate
Siri AI Comes to the Mac
The headline feature is the completely rebuilt Siri AI found across Apple’s other operating systems this year. After indexing your content from Mail, Messages, and other apps, Siri can answer questions, search your personal information, and take actions. And it’s all accessible through a dedicated Siri chat app or directly from Spotlight with the familiar Command + Space shortcut. Visual Intelligence also comes to the Mac, letting Siri look at what’s on your screen and answer questions about it without you switching apps.
In my time with Siri AI, I’ve come away very impressed. Apple’s reworked voice assistant is so helpful that I actually think to ask Siri first now rather than immediately opening a new Google search tab. And while integration with third-party apps hasn’t yet fully arrived, Siri’s ability to look for data within Apple’s first-party apps like Mail, Messages, Calendar, and Home is extremely helpful. If I have a question about the details of an email, message, meeting, or event time/place I can just ask Siri rather than digging through these apps..
A More Resolved Liquid Glass
Golden Gate doesn’t scrap last year’s Liquid Glass design, but it does walk back several of the missteps from macOS Tahoe. Sidebars are back at the edge of the window with a darker background for contrast instead of floating and inset. Windows now use a unified corner radius so they no longer look inconsistent depending on their contents, and a new system-wide transparency slider (in the Appearance pane of Settings) lets you dial the glass effect anywhere from mostly transparent to mostly opaque. The effect is a big improvement over Tahoe. In fact, the return of consistent corner radii has been enough to encourage many to immediately install the Golden Gate beta.
A Much-Improved Spotlight and Search
Spotlight search, which became notably unreliable on macOS Tahoe, appears mostly fixed in Golden Gate, as part of the broader under-the-hood overhaul Apple made to support Siri AI. Search improvements also extend to Mail and Messages.
Apple Intelligence Upgrades Across the System
Writing Tools have been redesigned to be more efficient, Safari gets a new extension builder that can create extensions from natural-language descriptions, Shortcuts can build automations from a plain-language request instead of manual step-by-step building, and Photos picks up new AI-powered editing tools.
Everyday Performance Improvements
Beyond the AI headlines, Apple has made a long list of under-the-hood changes aimed at making the Mac simply feel better to use: faster AirDrop transfers, more consistent window positioning across multiple displays, HDR UI elements and faster refresh rates on supported displays, resizable windows in iPhone Mirroring, and full-resolution images in Shared Albums.
One notable removal: macOS 27 Golden Gate drops AFP support, ending Time Machine compatibility with older Time Capsule devices.
Why the Beta Is Worth Trying
If last year’s Liquid Glass redesign in macOS Tahoe left you confused and angry, Golden Gate will likely alleviate much of your consternation. Reviewers who sat out Tahoe are already saying it’s the version they’ve been waiting for. Combined with a genuinely improved Spotlight and a slew of quiet performance fixes, this is a beta that’s more about refinement than risk. That said, it’s still beta software, with reports of occasional memory issues in Safari and reduced reliability in Spaces, so treat your daily-driver Mac accordingly.
That’s exactly why we recommend testing it on an external drive rather than your internal SSD whenever possible. That way, you get the full experience with zero risk to your main setup.
How to Install the macOS 27 Golden Gate Public Beta Directly on Your Mac
If you’re comfortable installing the beta straight onto your Mac’s internal drive, the process is simple. Just make sure to back up your Mac with Time Machine or another solution first, since beta software can introduce bugs, app compatibility issues, and other instability.
- Enroll your Mac in the beta program at beta.apple.com.
- Go to System Settings > General > Software Update.
- Click the “i” button next to Beta Updates.
- From the dropdown menu, select macOS 27 Golden Gate Public Beta.
- Click Done, then return to Software Update and click Upgrade Now (or Update Now) when the beta appears.
- Enter your Mac’s password to begin the installation. Your Mac will restart once it’s complete.
How to Install the macOS 27 Golden Gate Public Beta on an External Drive (Risk-Free)
Installing directly on your internal SSD means a single bad beta bug could cause serious downtime on your main Mac. Installing to a dedicated volume on an external drive avoids that entirely: your current macOS install and your internal SSD stay completely untouched, and you can boot into the beta only when you want to test it.
Why Run the Beta on an External Volume
- No risk to your daily macOS setup — bugs stay isolated to a dedicated slice of an external drive.
- No need to erase or partition your Mac’s internal drive.
- Freedom to explore the beta without commitment.
- The drive can boot on any compatible Mac.
Best OWC SSDs for a macOS Beta Install
Since you’ll be running macOS off of this external volume, you’ll want the drive to be fast and reliable for a fast install and a smooth beta testing experience:
OWC Envoy Ultra: Thunderbolt 5 speeds over 6,000 MB/s providing speeds that approach real-world internal drive speeds of the latest MacBook Pro models. The Ultra is ideal for pro-level testers and creative workflows. Starting at $699.
OWC Express 1M2: USB4 speeds up to 3,150 MB/s, a great, easily upgradable DIY value option for most beta testers. Empty enclosure starting at only $78.99.
OWC Envoy Pro Elektron: USB 3.2 Gen 2 speeds up to 1,011 MB/s in a palm-sized, waterproof, dustproof, crushproof enclosure — best for portability. Starting at $379.99
Step 1: Format and Create a Volume on Your External Drive
- Plug in your OWC external SSD.
- Open Disk Utility (Finder > Applications > Utilities).
- In the sidebar, click View and select Show All Devices.
- Select the top-level of your OWC drive (not the volume underneath it).
- Click Erase in the toolbar. Set:
- Name: something simple, like “GGBoot” or “OWCInstall.”
- Format: APFS is recommended for macOS 27 Golden Gate. (If you run into trouble creating the installer in the next step, you can reformat the top level as Mac OS Extended Journaled instead.)
- Scheme: GUID Partition Map.
- Click Erase, then Done.
- Click the container beneath your newly formatted top-level drive, then click the + icon to create a new volume — name it something like “Golden Gate Beta.” You can restrict its size under Size Options if you’d like.
- Once the volume is created, you can quit Disk Utility.
Step 2: Download macOS Tahoe
The most straightforward way to get the beta onto an external volume is to first install the current shipping version of macOS — Tahoe — to that volume, then upgrade to the beta from there.
- Open the Mac App Store.
- Search for macOS Tahoe.
- Click Get or the download icon. This is a large file (typically 12GB+), so make sure you have the space and time.
- Once downloaded, if the installer launches automatically, quit it (Command + Q) — don’t install to your main drive.
Step 3: Run the macOS Tahoe Installer to Your New Volume
- From your Applications folder, launch the macOS Tahoe installer.
- When asked where to install, choose the volume you just created (click “View All” if you don’t see it right away).
- Let the installation complete, then click Restart.
Step 4: Set Up macOS and Sign In
Your Mac will boot from the new external volume. You’ll be asked whether to create a new administrator account or import your existing one — importing your current account is the easiest path.
- Sign in with your Apple ID during setup. You’ll need this to enroll the new install in the beta program.
- Complete as much or as little of the remaining setup as you’d like.
- By default, this new install becomes your Mac’s startup disk. To change that, go to Settings > General > Startup Disk and choose your regular install instead — or simply hold the power button at startup (Apple Silicon) or the Option key (Intel) to choose which disk to boot from each time.
Step 5: Enroll in the Beta Program and Install macOS 27 Golden Gate
- Visit beta.apple.com.
- Sign in with your Apple ID.
- Click enroll your Mac under Getting Started.
- Under “Turn on Beta Updates,” click Open Software Update, then Allow.
- In Software Update, click the “i” icon next to Beta Updates and choose macOS 27 Golden Gate Public Beta from the dropdown.
- Click Upgrade Now and enter your Mac’s password.
- Your Mac will install the update and restart. You’re now running macOS 27 Golden Gate on your external volume.
Switching Between Your Main macOS Install and the Beta
Swapping back and forth is easy: change your Startup Disk in Settings, or shut down and hold the power button (Apple Silicon) or Option key (Intel) during startup to choose which install to boot into.
Removing the Beta
Boot into your main macOS install, open Disk Utility, select the volume containing the beta, and delete it. Your internal drive and main setup are never touched in the process.